If you want to make perfect digital and lossless copies of our music-CDs, then this is for you. By following this guide you should be able to make bit-perfect verified copies so you never have to do it again.
This process includes ripping/correcting/verifying the CDs to raw WAV and converting it to the smaller (but lossless) audio-format FLAC (Free Lossless Audio Codec). You will also get a log file as documentation of the procedure in addition to as a Cue sheet.
Setup and configuration
Download and install Exact Audio Copy
Download the last available version of Exact Audio Copy here. In this guide I am using the last version available to this date, V1.6.
The installation is straightforward, when asked to choose components leave all selected (you can deselect GD3 Metadata Plugin, it is a commercial plugin that we will not be using anyway). The installation takes up less then 20MB in total, even with all the plugins. You might be prompted to install .NET Framework 3.5, if so go ahead and install this also.
Setup Exact Audio Copy
Startup
If the GD3 Metadata Plugin was installed, when you first run EAC this message will pop up: “The test version of the GD3 metadata provider was installed together with EAC. Do you want to use the 10 album lookups test version as the current metadata provider?” Click No on this. It will not be used. You will also get a popup “Welcome to the EAC setup wizard”. Click Cancel on this, we will not use this wizard this time.
Calibrate AccurateRip
The AccurateRip plugin will use a checksum from a known CD to calculate the offset for your specific disc drive.
In Exact Audio Copy make sure you have the correct disc drive selected in the upper left corner and insert a Music CD. If the CD is in the AccurateRip database this message will show up. If not try a new CD and repeat until you have a CD that can be detected and used. You know the CD is usable when the popup is seen.

Click Configure, and hopefully this should pop up (offset value depends on the drive):

The AccurateRip logo down in the right corner is indicating that AccurateRip is calibrated.
EAC Options
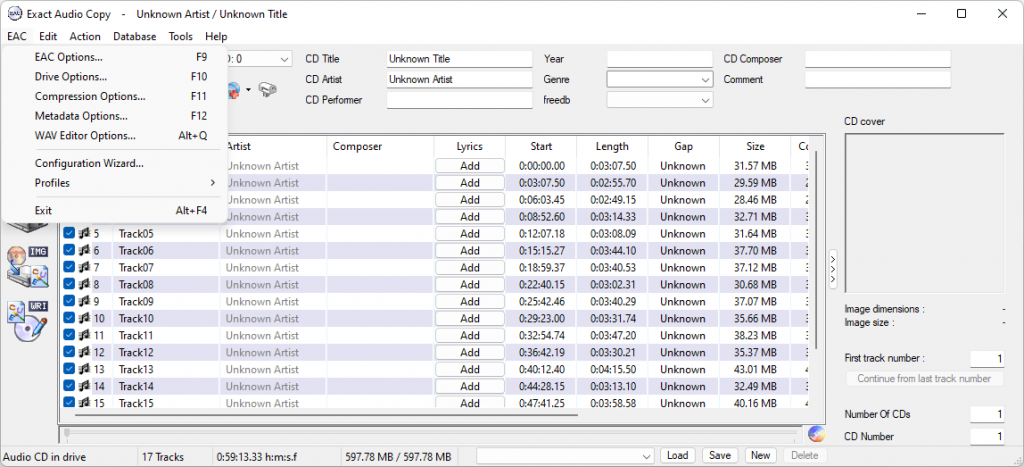
- Open the EAC Options by clicking EAC -> EAC Options…
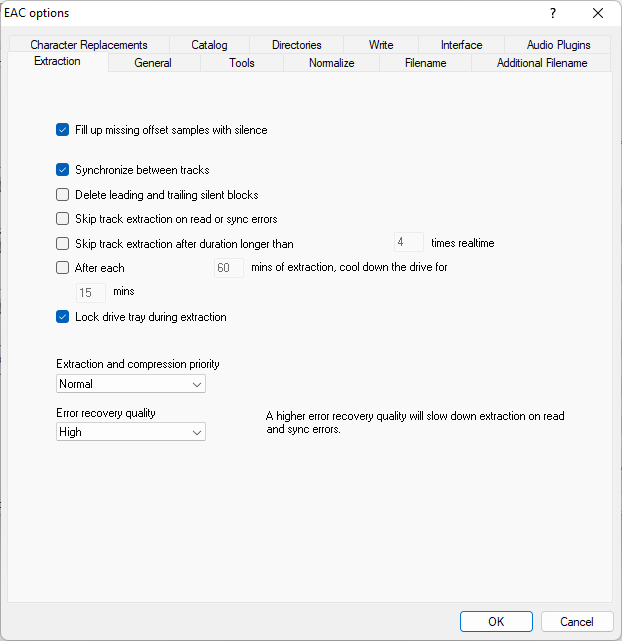
- Click on the Extraction tab and fill as follows:
- Check “Full up missing offset samples with silence” (Default)
- Check “Synchronize between tracks” (Default)
- Set “Error recovery quality” to “High“
The rest can stay as default.
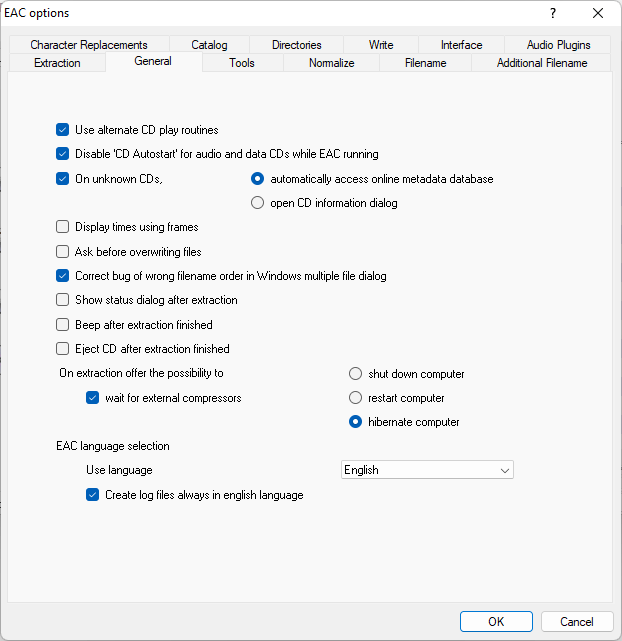
- Click on the General tab and fill as follows:
- Check “Use alternate CD Play routines” (Default)
- Check “Disable ‘CD Autostart’ for audio and data CDs while EAC running“
- Check “On unknown CDs,” and select “automatically access online metadata database“.
- Check “Create log files always in english language“
The rest can stay as default, or as you prefer.
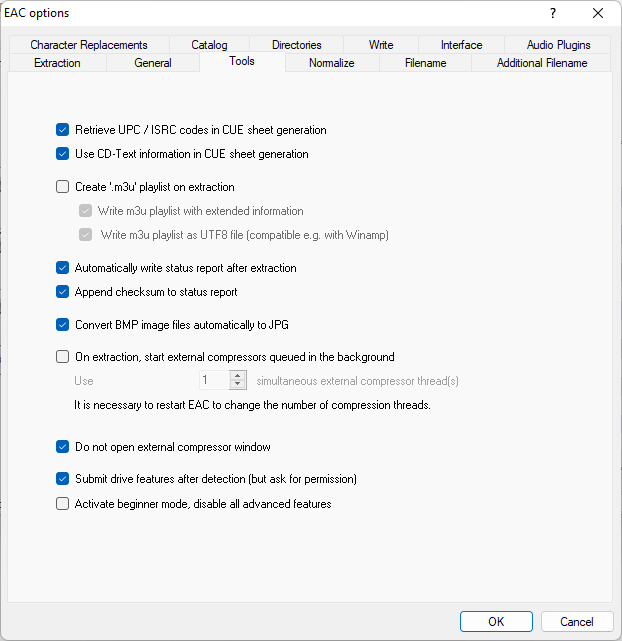
- Click on the Tools tab and fill as follows:
- Check “Retrieve UPC / ISRC codes in CUE sheet generation“
- Check “Use CD-Text information in CUE sheet generation” (Default)
- Check “Automatically write status report after extraction“
- Check “Append checksum to status report“
- Check “Convert BMP image files automatically to JPG” (Default)
- Don’t Check “On extraction, start external compressors queued in the backround” (Default)
- Don’t Check “Activate beginner mode, disable all advanced features” (Default)
The rest can stay as default, or as you prefer.
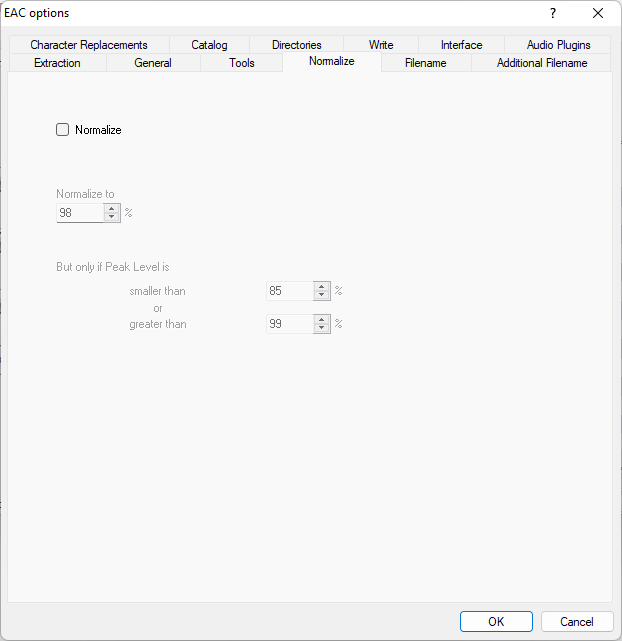
- Click on the Normalize tab and verify that “Normalize” is not checked.
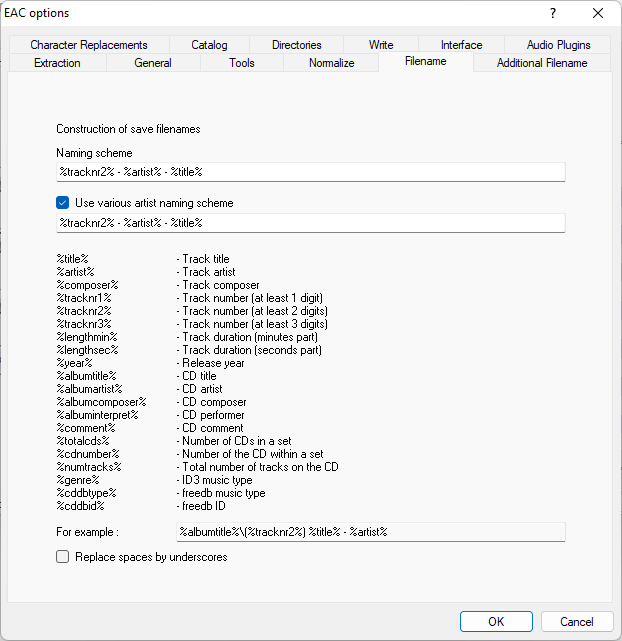
- Click on the Filename tab and fill as you prefer, but this is an example:
- On “Naming scheme“, fill:
%tracknr2% - %artist% - %title% - Check “Use various artist naming scheme“, fill:
%tracknr2% - %artist% - %title%
Some people prefer to remove%artist%from non-various artist releases (I don’t).
- On “Naming scheme“, fill:
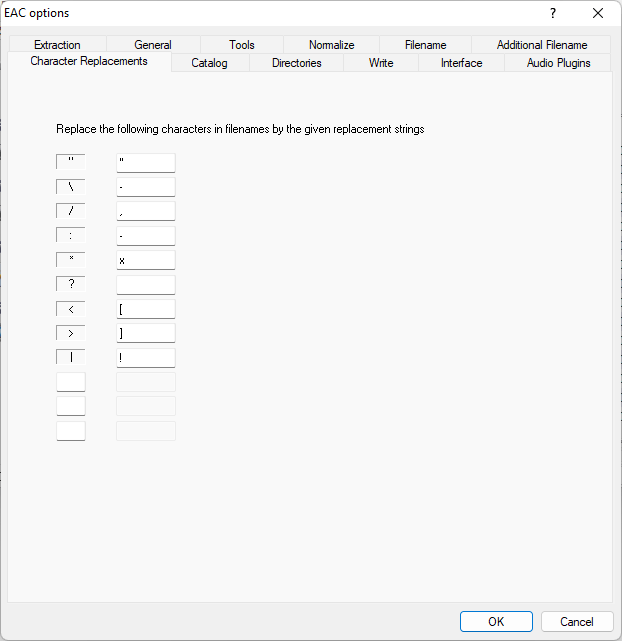
- Click on the Character replacements tab if you want to set your own characters to replace characters not allowed by the files system. No changes here is required.
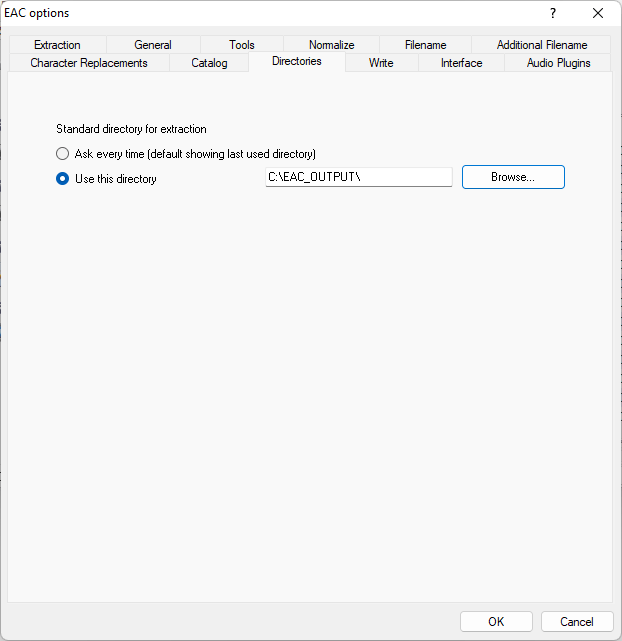
- Click on the Directories tab and fill as you prefer, no changes are needed. If you want a fixed location for your rips, then select “Use this directory“, “Browse…” and select folder.
- Click “OK“
Drive Options
Open the Drive Options by clicking EAC -> Drive Options…

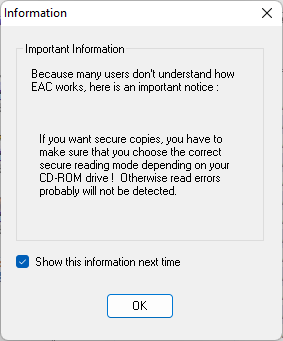
Click “OK” on this message:
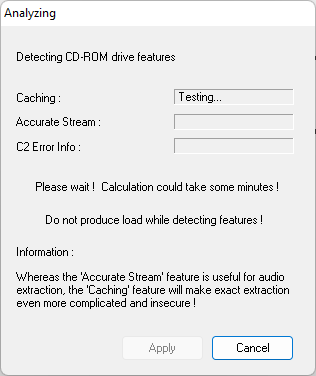
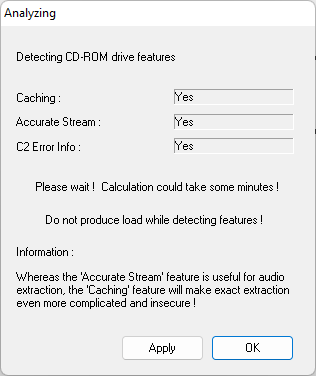
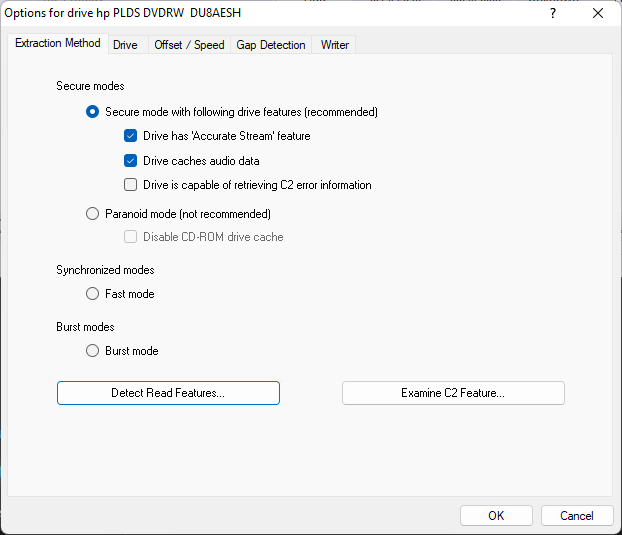
- Click on the Extraction Method tab and click “Detect Read Features…“. Test the drive with a CD inside and take note of the results.
- Select “Secure mode with following drive features (recommended)”
- Check “Drive has ‘Accurate Stream’ feature” (If detected by the test)
- Check “Drive caches audio data” (If detected by the test)
- Don’t check “Drive is compatible of retrieving C2 error information” (not even if the test result show it as supported). This feature is relying on the drive to report errors, often not a reliably function on many drives.
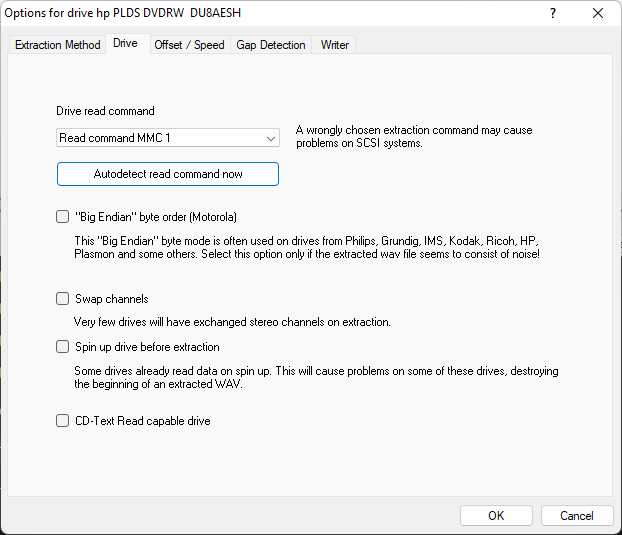
- Click on the Drive tab and click “Autodetect read commands now“. The “Drive read command” will be filled.
Check the next three options only if you have special reasons to do so.
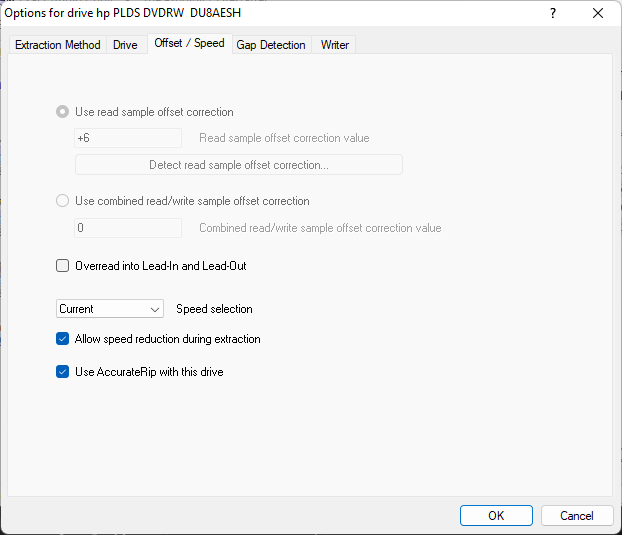
- Click on the Offset / Speed tab and fill as follows
- Uncheck “Overread intro Lead-In and Lead-Out” (Default) unless you are sure your drive supports it.
- Check “Allow speed reduction during extraction” (Default)
- Check “Use AccurateRip with this drive” (Default)
- Click on the Gap Detection tab and fill as follows
- “Gap/Index retrieval method:” “Detection method A” (Change to B, or C later if you have problems with detecting gaps while ripping
- “Detection accuracy:” “Secure“
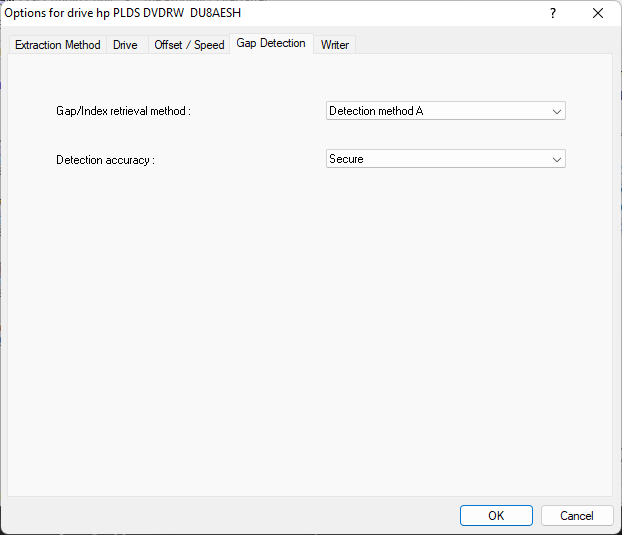
- Click “OK“
Compression Options
Open the Compression Options by clicking EAC -> Compression Options…
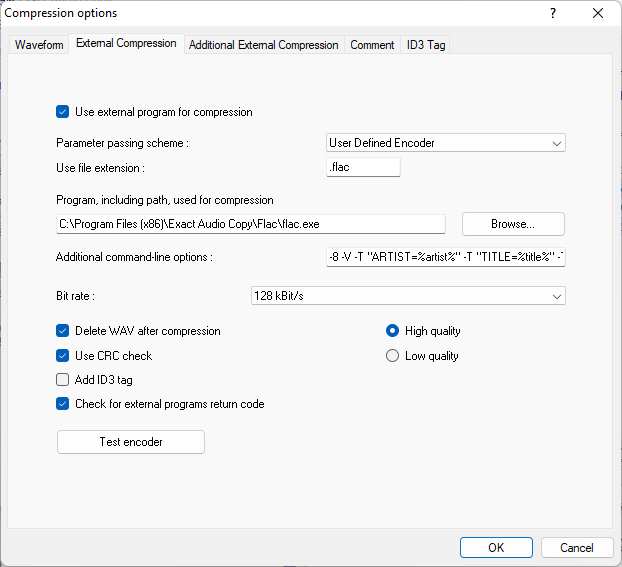
- Click on the External Compression tab and fill as follows
- Check “Use external program for compression“.
- Select “Parameter passing scheme:” “User Defined Encoder“.
- Write “.flac” in the “Use file extension:” field.
- Under “Program, including path used for compression” select your
flac.exe(included in EAC program files,Exact Audio Copy\Flac\flac.exe) - In the “Additional command-line options:” field copy and past the following:
-8 -V -T “ARTIST=%artist%” -T “TITLE=%title%” -T “ALBUM=%albumtitle%” -T “DATE=%year%” -T “TRACKNUMBER=%tracknr%” -T “GENRE=%genre%” -T “PERFORMER=%albuminterpret%” -T “COMPOSER=%composer%” %haslyrics%–tag-from-file=LYRICS=”%lyricsfile%”%haslyrics% -T “ALBUMARTIST=%albumartist%” -T “DISCNUMBER=%cdnumber%” -T “TOTALDISCS=%totalcds%” -T “TOTALTRACKS=%numtracks%” -T “COMMENT=%comment%” %source% -o %dest%
NB: In the above command, you have to replace all double quotes (“..”) with straight ones.
(Looks like WordPress is not able to publish the correct character.) - Check “Delete WAV after compression” (Default)
- Check “Use CRC check” (Default)
- Uncheck “Add ID3 tag“
- Check “Check for external programs return code“
- Click on the ID3 tag tab and fill as follows
- Uncheck everything besides “Write cover image to extraction folder“, that one can be checked.
- In “naming scheme:” write
Cover(or what you want your cover-art to be named) - Click “OK“

Metadata Options
Open the Metadata Options by clicking EAC -> Metadata Options...
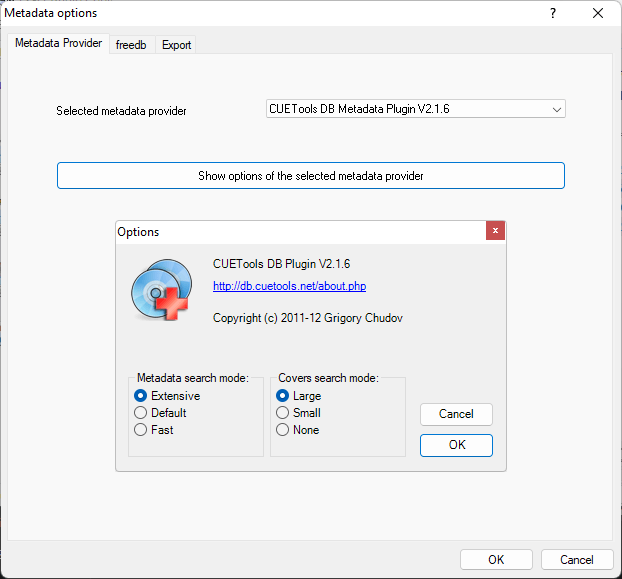
- Click on the Metadata Provider tab and fill as follows
- On “Select metadata provider” select “CUETools DB Metadata Plugin V2.1.6” (or Newer)
- Click “Show options of the selected metadata provider“
- Select “Extensive” under “Metadata search mode” and “Large” under “Cover search mode“. Both these choices are optional.
- Click “OK” on the Option popup.
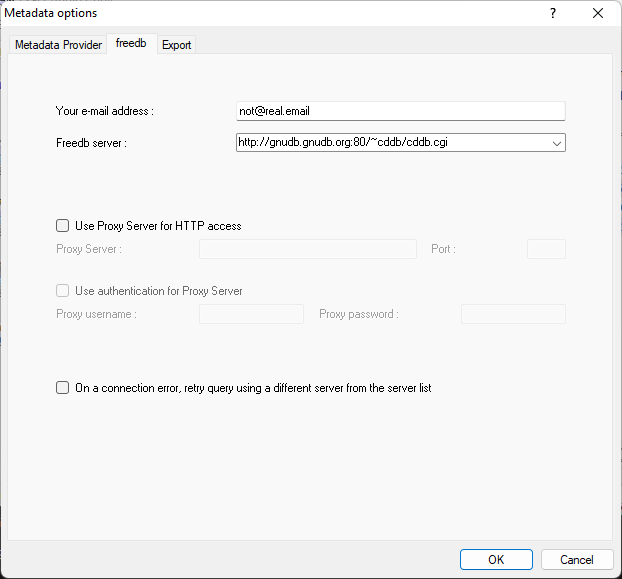
- Click on the freedb tab and fill as follows
- On “Your e-mail address:” write an email, it does not have to be real or exist.
- Click “OK“
Now, that is the whole setup process! let’s go to the actual ripping routine.
Ripping CDs
Ripping CDs require some more steps then most rippers out there, and it will take more time. In return, you get better results than with most other programs.
All steps done until know has been seing up the program, all steps down from here is what you have to do each time you rip a new CD. It is impotent that these stems below is done in he order they are written.
Metadata
The first step is to download metadata for the files from the CUETools metadata database.
- Insert the CD in the disc drive
- Click the down-arrow right to the logo with two CDs and a plus and select “CUETools DB Metadata Plugin V2.1.6” (Or newer)
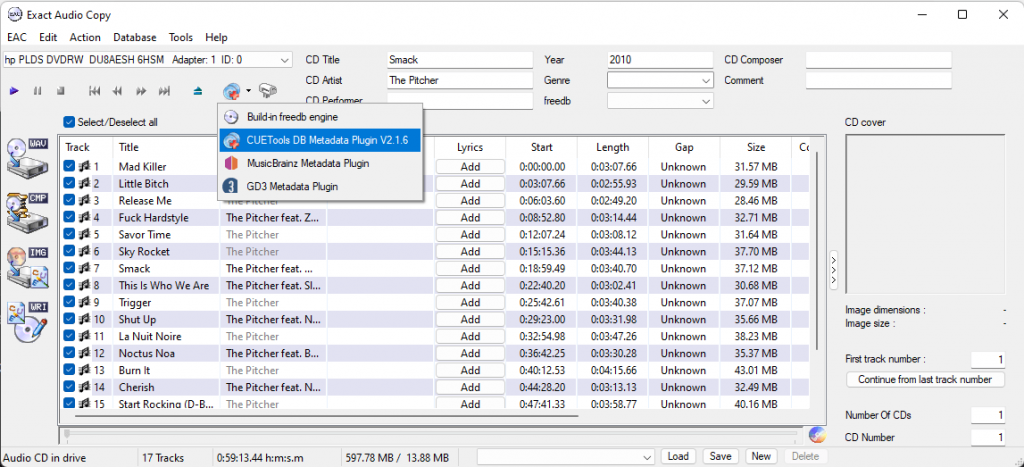
- Click the logo with two CDs itself
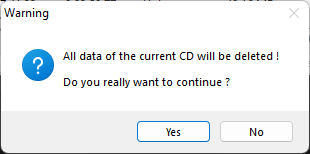
- Click “Yes” on warning (picture below)
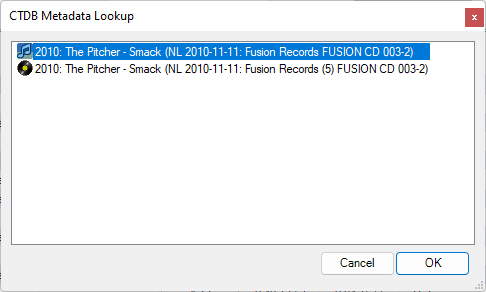
- Select the closest release that is found and click “OK“
After metadata is collected, check manually if it is correct, all fields can now be manually edited in the EAC window.
Detect GAPS
Caps is “spaces” between tracks on the disc. It does not affect sound-quality, but must be detected to make the copy accurate.
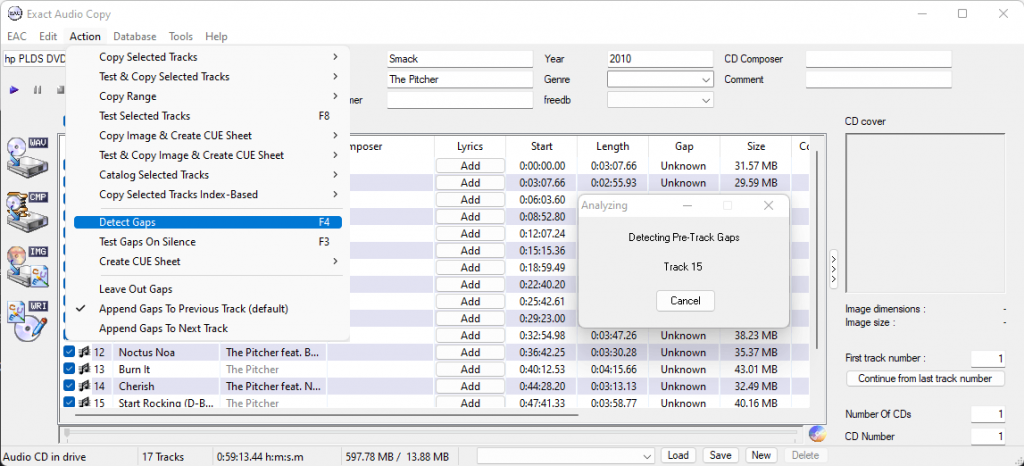
- Click on “Action” and verify that “Append Gaps To Previous track (default)” is checked, if not check it.
- In the same “Action” menu click “Detect Gaps” and wait for the Analyzing to finish.
When this is done the “Gap” fields should change from “Unknown” to a timestamp.
Create CUE Sheet
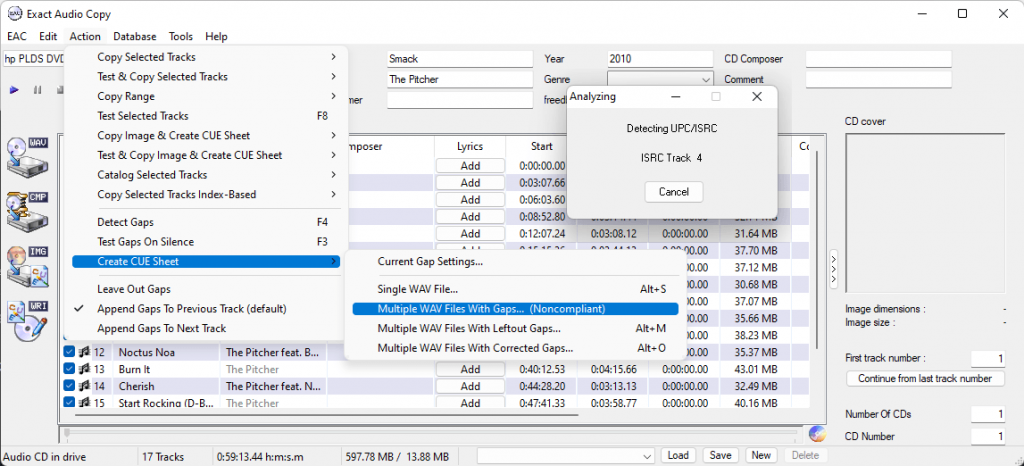
A CUE sheet is a small text-file that store Information about how and where the tracks should be written plus some more Information if you laster will burn a new CD based on ripped files. A CUE Sheet is not required, but I strongly recommend that you generate it just in case.
- Click “Action” -> “Create CUE Sheet” -> “Multiple WAV Files With Gaps… (Noncompliant)” and Wait for the Analyzing window to finish.
Extract and compress
The last step is the ripping itself. This step will extract the data from the CD, verify and try to fix errors and then compress the output to FLAC.
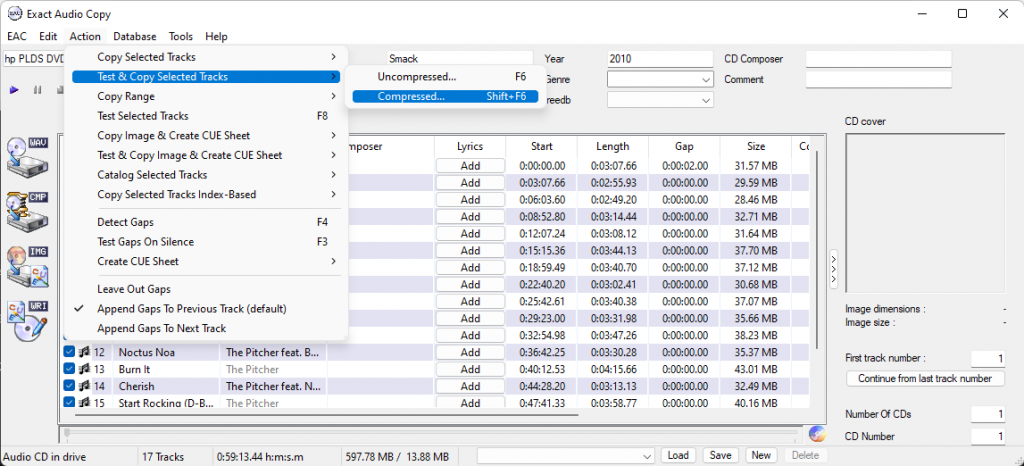
- Click “Action” -> “Test & Copy Selected Tracks” -> “Compressed…“
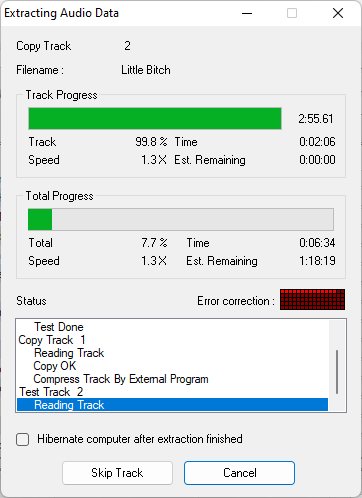
- A popup “Extraction Audio Data” is showing and the ripping has started. Depending on the condition on the CD, this can take a very long time.
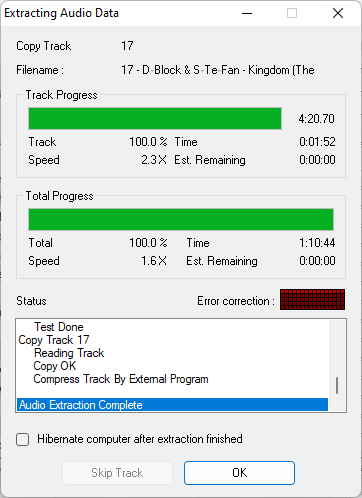
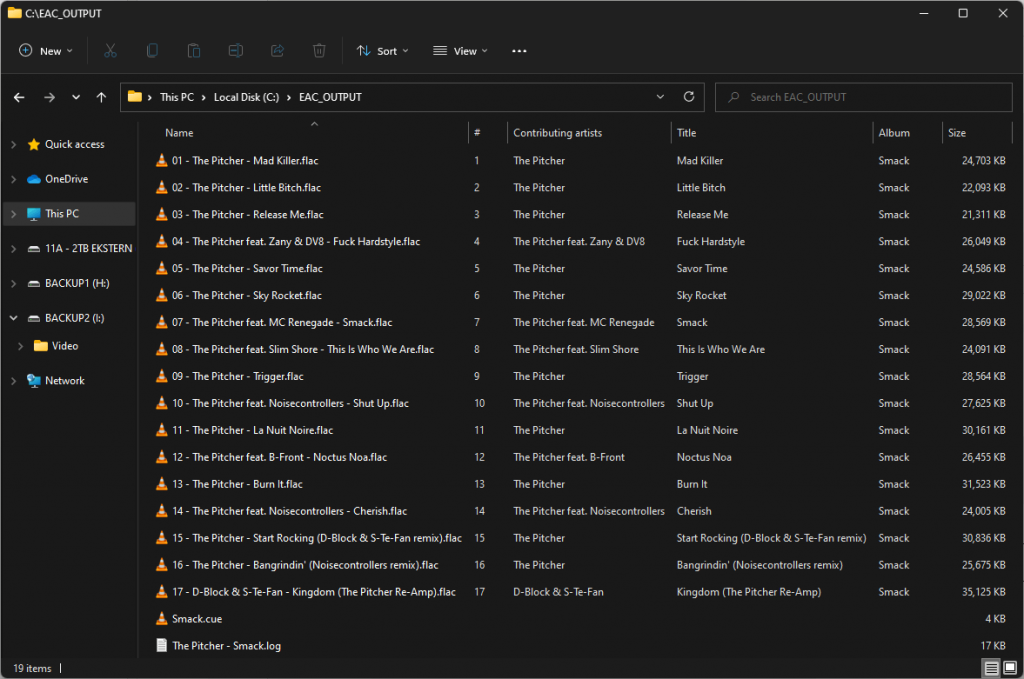
When the process is finished the FLAC-files along with the .log and .cue (and a .jpg if available) is located in the output folder.
Verify rip
When the extraction and compression process is complete it is a good ide to verify that the job done successfully (or not).
First check that all files are saved as .flac, sometimes the encoder fails and it will not be reported in the log.
Analyzing the .log file
First open the .log file in a text-viewer (like Notepad) and check what the end of status report is.
This is how a successful rip should look.
All tracks accurately ripped

No errors occurred

End of status report
This is how a unsuccessful rip is looking. It is telling us that here where errors that was not possible to correct and verify.
Some tracks could not be verified as accurate

There were errors

End of status report
If there ware errors you can look at the individual tracks.
In the example below it is mentioning Copy finished, Cannot be verified as accurate and Suspicious position 0:02:05 - 0:02:11. This means that the track probably contains errors. They are sometimes audible, other times not. Listen for errors in especially in the time interval indicated.
Track 16

     Filename C:\EAC_OUTPUT\16 - The Pitcher - Bangrindin' (Noisecontrollers remix).wav

     Suspicious position 0:02:05 - 0:02:11

     Peak level 100.0 %
     Extraction speed 0.7 X
     Track quality 96.9 %
     Test CRC 434BD8B4
     Copy CRC D020485F
     Cannot be verified as accurate (confidence 3)  [254AB38A], AccurateRip returned [E5981F6F]  (AR v2)
     Copy finished
This is how a successful track is looking, it is mentioning Accurately ripped and Copy OK.Track quality is sometimes below 100%, this just means that re-reading was necessary. These errors was corrected so the copy is indeed 100% accurately ripped! No problem or quality loss here.
Track  2

     Filename C:\EAC_OUTPUT\02 - The Pitcher - Little Bitch.wav

     Peak level 100.0 %
     Extraction speed 0.9 X
     Track quality 99.9 %
     Test CRC 5F2A6E3A
     Copy CRC 5F2A6E3A
     Accurately ripped (confidence 1)  [FAA3D707]  (AR v2)
     Copy OK
At the end of the log file the CUETools DB Plugin will have it’s own report, this is comparing the rip to other equal rips in it’s database. As long as it writes out Accurately ripped on all the tracks and the CTDB TOCID is equal to Submit result you should be okay.
---- CUETools DB Plugin V2.1.6

[CTDB TOCID: KyVydx1nYbdEYuAsw3Ke1nt8Qks-] found
Submit result: KyVydx1nYbdEYuAsw3Ke1nt8Qks- has been confirmed
Track | CTDB Status
1 | (4/5) Accurately ripped
2 | (4/5) Accurately ripped
3 | (4/5) Accurately ripped
4 | (4/5) Accurately ripped
5 | (4/5) Accurately ripped
6 | (4/5) Accurately ripped
7 | (4/5) Accurately ripped
8 | (4/5) Accurately ripped
9 | (4/5) Accurately ripped
10 | (4/5) Accurately ripped
11 | (4/5) Accurately ripped
12 | (4/5) Accurately ripped
13 | (4/5) Accurately ripped
14 | (4/5) Accurately ripped
15 | (4/5) Accurately ripped
16 | (4/5) Accurately ripped
17 | (4/5) Accurately ripped
Good luck with your 💿-ripping 😊
Do you have questions or comments/opinions? Feel free to post in the comment field below
Sources
- https://wiki.slimdevices.com/index.php/Beginners_guide_to_EAC.html
- https://wiki.hydrogenaud.io/index.php?title=EAC_Drive_Options
- https://www.exactaudiocopy.de/en/index.php/overview/basic-technology/automatic-feature-detection-technology/
- http://doujinstyle.com/eac/setup.html
- https://www.youtube.com/watch?v=LkLCzfBa2gI
- https://www.youtube.com/watch?v=58RmQsGGbeQ
- https://www.mediamonkey.com/forum/viewtopic.php?t=30377
- https://hydrogenaud.io/index.php/topic,37800.0.html
- https://en.wikipedia.org/wiki/Cue_sheet_(computing)
- http://cue.tools/wiki/CUETools_log