NextCoud is an Open-source cloud platform you can host yourself. It is like Dropbox, but can also do a lot more. But most important you have full control over your own files. In this guide I will show how to set it up it’s FreeNAS plugin, and also how to use your FreeNAS datastores in NextCloud.
Install the NextCloud plugin
The first step is to open up FreeNAS GUI and navigating to Plugins in the left menu.
If you want to change the default pool for Plugins and Jail storage click the gearwheel icon and select your preferences.
This is where NextCloud will be stored, but not (necessarily) the cloud files.
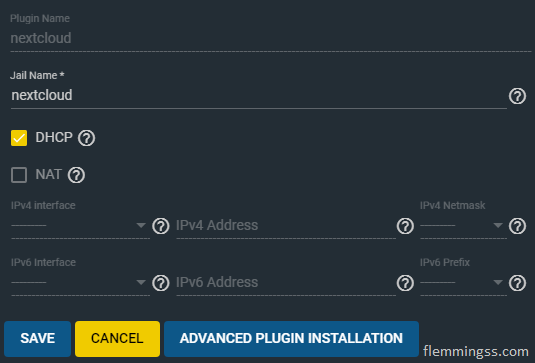
To install NextCloud, just find NextCloud and hit INSTALL.
If you want to configure static IP that can be done by leaving DHCP unchecked, this can also be done later if needed.
Enter a Jail name and click SAVE. Wait a a few minutes for the installation to complete.
Set up Mount Points
Mount points are “links” between the FreeNAS filesystem and the jail filesystem. This is needed to reach files because the jail is isolated from the base OS.
Go back to Plugins and open the drop-down menu right for the NextCloud jail. Click Stop to stop it, after this click on Mount Points.

Click on Actions and ADD. Here you need to select the correct path for Source and Destination.
In Source select a directory where your cloud data should be stored.
In Destination select where NextCloud will find the the cloud files inside it’s own jail.
The last directory in the source path is not mounted, just the sub-files and folders inside of it. So make sure to add it to the end of the destination path as well.
Click SAVE.
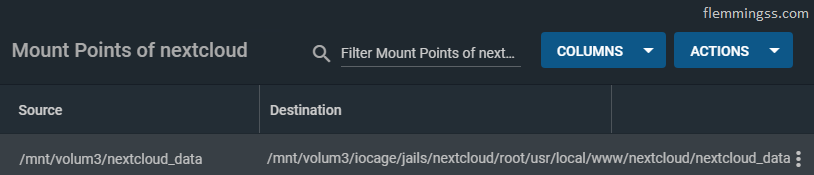
This is how my configuration looks: (volum3 is my pool)
Source: /mnt/volum3/nextcloud_data
Destination: /mnt/volum3/iocage/jails/nextcloud/root/usr/local/www/nextcloud/nextcloud_data
Share permissions
For NextCloud to be able to use the added mount point the www user must have access to it..
Assuming this dataset uses ACL permissions go to Storage and then Pools.
Select the tree dots right for you dataset and then hit Edit ACL.
Click ADD ACL ITEM and fil as shown in the image below.
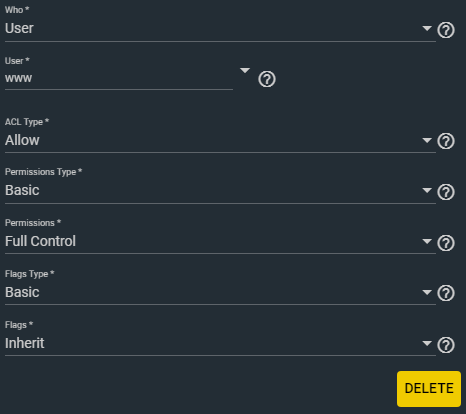
Check “Apply permissions recursively” and click SAVE.
NextCloud should now have full access.
Configure trusted domains
If you now open the web interface for NextCloud the message “Access through untrusted domain” will appear. This it is because you access it by an IP or domain that is not white-listed. To fix this just follow these instructions to add it to your white list:
- Go back to Jails in the left menu in FreeNAS and open the drop-down menu right for the NextCloud jail. Click on SHELL and a CLI interface will appear.
- Run
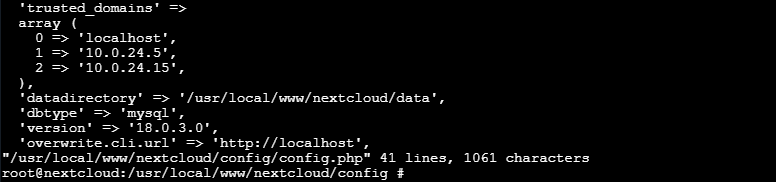
ee /usr/local/www/nextcloud/config/config.php - Now ee (a built-in text editor) will open config.php.
- Scroll a little down and you will find a part like this:
  'trusted_domains' =>
  array (
    0 => 'localhost',
    1 => 'FREENAS_IP',
),- Bellow 1 make a new record of your NextCloud IP. In My case 10.0.24.15, and the formatting will be
2 => '10.0.24.15', - Click CTRL+C to exit the editor.
- The CLI will prompt with command:
writeexitto save and exit (orquitto exit without saving)
NextCloud Web Setup
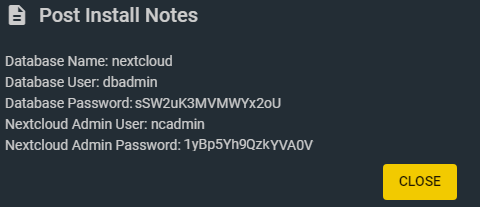
Go back to Plugins and open the drop-down menu right for the NextCloud jail. Click on POST INSTALL NOTES. Take note of this information
Now you can go to Plugins and start NextCloud.
NextCloud is now starting, to access the web GUI go to http://<nextcloud_ip> or just click MANAGE.
You can now log inn with the Nextcloud Admin user and password provided in Post Install Notes.
Adding Storage in NextCloud
By default you will use the space inside the jail to store files.
But to store the cloud data outside it’s jail and inside the earlier created mount point a few more steps are required.
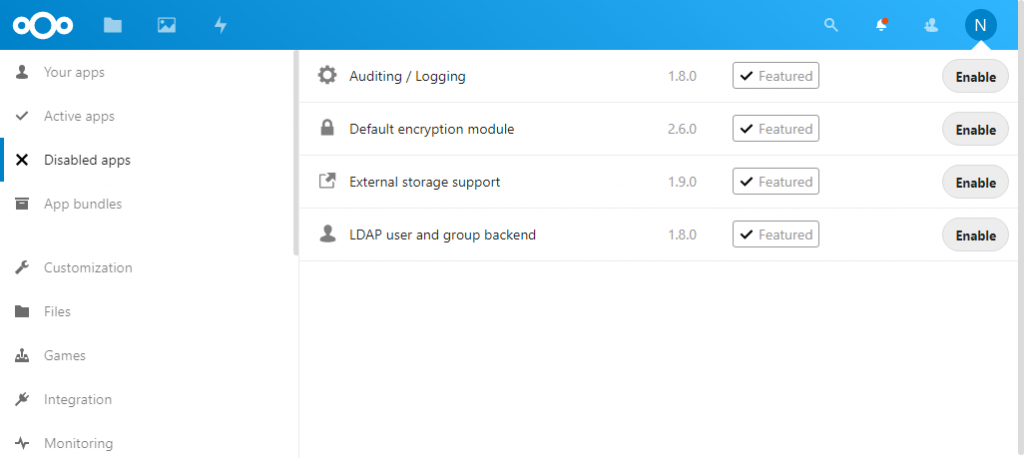
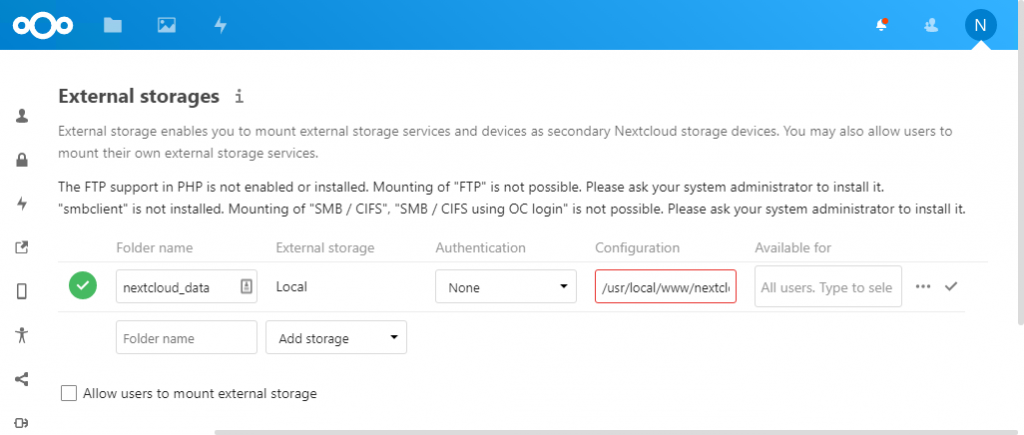
- Click the user-icon “N” in the upper right corner and then click on Apps
- Select Disabled apps in the menu and click Enable on External storage support.
- Click the user-icon “N” in the upper right corner again and then on Settings
- Under “Administration” in the left menu (not under “Personal“!) click on External storages.
- Select Local under External storage and
/usr/local/www/nextcloud/nextcloud_dataunder Configuration. - Change the Folder Name if you want and click save (the check-mark button)
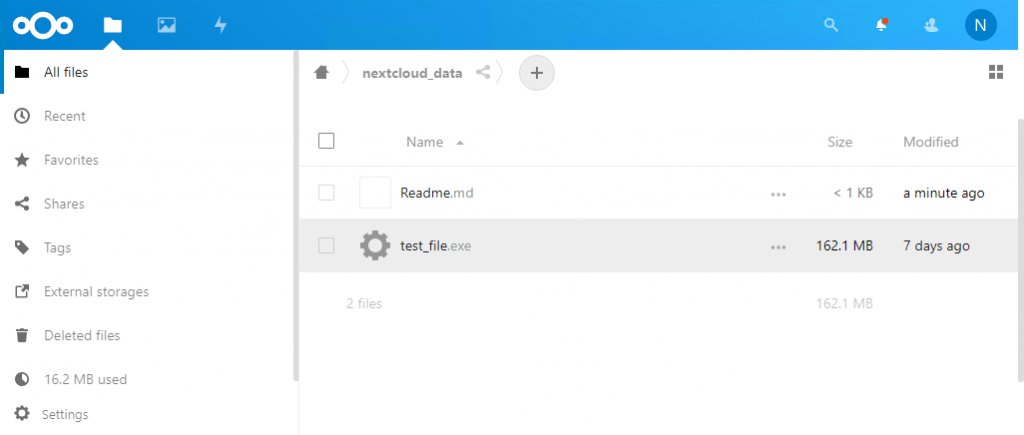
Back on NextCloud you should now find this folder. All files that is stored in this location will now be stored in the mounted datastore.
You will now have a up and running installation of NextCloud in FreeNAS!
Sources
- https://www.ucl.ac.uk/~ccaabaa/is/unix/ee.htm
- https://docs.nextcloud.com/server/18/admin_manual/installation/installation_wizard.html#trusted-domains
- https://www.youtube.com/watch?v=60xwnoIrUTI
- https://help.nextcloud.com/t/no-permissions-to-configure-external-storage/29411