
If you use docker (apps) in UnRAID, backup of the appdata folders are essential. These folders are often in constant use by containers, so doing a normal copy-paste while the containers are running may not be the best way to do a backup. It can cause issues with files in use/changed in the middle of the backups etc, a much safer solution is to turn off the docker containers, backup the appdata-folder, then turn the containers on again. That is basically what the “CA Backup / Restore Appdata” does, but in a clean and easy way so you don’t have to do it all manually. It can also be scheduled.
In this post I will just go trough all options, try to explain them and give some examples.
Based on the current v2.5 of the plugin on UnRAID 6.11.5.
UPDATE 2023-08-12: The Appdata Backup/Restore v2.5 plugin will not longer work on newer installs like UnRAID 6.12.x and newer (There is a new replacement called Appdata Backup, and I will write guide for this also when I get the chance)
They work quite similarly, but there are also some differences that I will return to in the aforementioned post.
Install the CA Backup / Restore Appdata plugin
If you have any apps, you probably also have the Community Apps plugin installed.
- Go to the “APPS” Tab and find Appdata Backup/Restore v2.5 by Robin Kluth.
- Install the application, go to the “PLUGINS” tab and “Installed plugins” and click the logo for “CA Backup / Restore Appdata
- This is where the plugin is located in the UI.
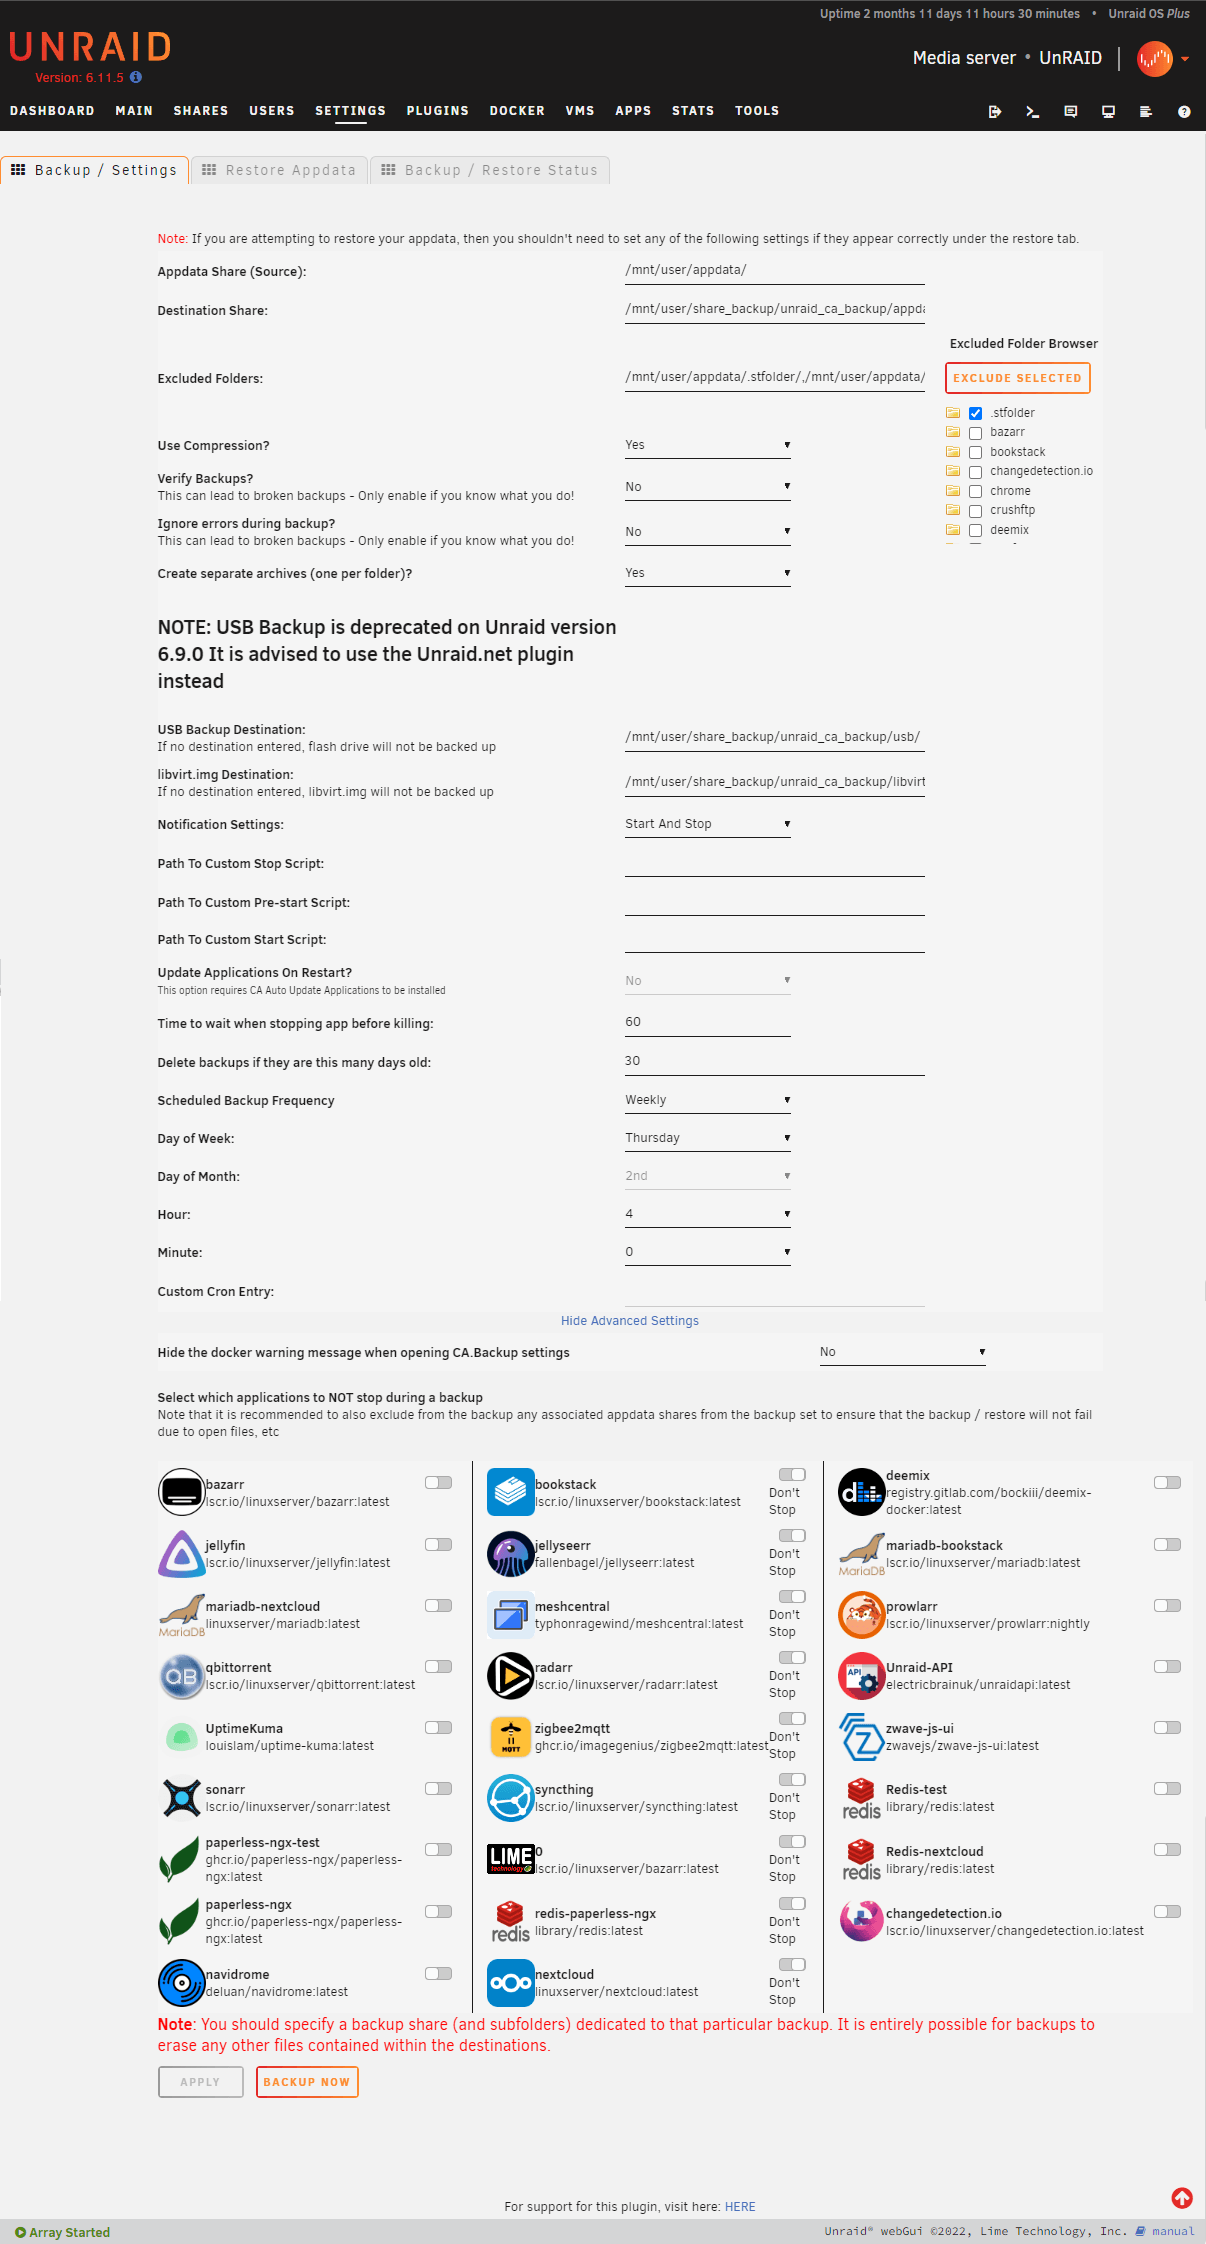
Appdata backup configuration
Appdata Share (Source):
This is where all appdata files are stored, the unraid default is /mnt/user/appdata/, use this if you have not changed this yourself.
Destination Share:
Here you need to write the path to the place you want to store your appdata backups. It can be a folder in a share, a share, or just a folder with no share. You have to create this folder yourself in file system because the plugin will not create it for you (but there is a path browser).
As an example, I am using /mnt/user/share_backup/unraid_ca_backup/appdata/ where share_backup is a unraid share and unraid_ca_backup/appdata/ is the dedicated folders inside.
Excluded Folders:
It may not always be necessary to backup up all appdata folders, you can here write the paths within appdata that should not be backed up separated by a comma character. It may be complete appdata folders or just parts of them.
This one will exclude the deemix, navidrome and nextcloud appdata:/mnt/user/appdata/deemix/,/mnt/user/appdata/navidrome/,/mnt/user/appdata/nextcloud/
This one will do the same, besides that it will actually backup the navidrome appdata, just not the /cache/ inside of it./mnt/user/appdata/deemix/,/mnt/user/appdata/navidrome/cache/,/mnt/user/appdata/nextcloud/
To start, there is a helper to the right in the interface to select appdata folders by UI called “Excluded Folder Browser”.
Use Compression?
If you want to, you can compress the appdata backup, it will take a little longer time, but result in a smaller file size. I did a comparison with some appdata, results follow:
| Uncompressed | Compressed | Difference |
| 4,54GB | 3,31GB | 1,23GB (37.19%) smaller |
| 3m5s | 3m58s | 53s (17.84% ) longer |
Verify Backups?
This option is how I understand it to verify that the backup is full and complete. I have not found any documentation about, but I guess it maybe will compare checksums.
Ignore errors during backup?
This may be checked if you have errors that is appropriate to ignore in your setup. I have not found a lot of detail about how this option works. My recommendation is to leave it off unless you have a special reason to turn it on
Create separate archives (one per folder)?
This option will let you separate each appdata folder in it’s own .tar file.
By default the backup is saved to YYYY-MM-DD@HH.MM\CA_backup.tar, this option will save to YYYY-MM-DD@HH.MM\CA_backup_<app_name>.tar (one per app)
USB backup configuration
USB Backup Destination:
If filled, the backup of the UnRAID usb drive will be enabled. As an example I am making the backup to /mnt/user/share_backup/unraid_ca_backup/usb
The content backed up is the files en folders of the /boot directory.
Libvirt backup configuration
libvirt.img Destination:
If filled, the backup of libvirt.img will be enabled. As an example I am making the backup to /mnt/user/share_backup/unraid_ca_backup/libvirt
The original libvirt.img are stored at /mnt/user/system/libvirt and are an virtualization solution used by Unraid behind the scenes.
Other backup settings
Notification Settings:
This choice let you decide what you will get notified about, the alternatives are “Disabled” (no notifications) “Errors Only”, “Start And Stop” and “Completion Only”. The options are pretty self-explanatory and down to personal preference
Path To Custom Stop Script:
If you want to run some own script when backup is stopped, paste the path here. This option is not required and not described in more detail in this guide.
Path To Custom Pre-start Script:
If you want to run some own script before the backup is starting, paste the path here. This option is not required and not described in more detail in this guide.
Path To Custom Start Script:
If you want to run some own script when backup is started, paste the path here. This option is not required and not described in more detail in this guide.
Time to wait when stopping app before killing:
This option let you set the time the plugin will wait before it kills (hard shutdown) an docker app if they don’t manage to turn turn off by itself in time. The default value is 60 Seconds, and that is ok in most cases. You can increase this value if you have apps that take longer time to end. A controlled termination is always preferable
Delete backups if they are this many days old:
This option will remove old backups, useful to avoid infinite increase in disk consumption due to backup. How long this should be set to us your own choice.
Scheduling
Manual backups are easy to forget, so a scheduled backup can be set.
Scheduled Backup Frequency
This option can be set to “Disabled” (if you just want to run the backup manually), “Daily”, “Weekly”, “Monthly” or “Custom” (See Custom Cron Entity below)
Day of Week:
Only available if Scheduled Backup Frequency is set to “Weekly”, select day of the week.
Day of Month:
Only available if Scheduled Backup Frequency is set to “Monthly”, select day of the month.
Hour:
What hour in the 24-hour clock the backup should start Range 0-23
Minute:
How many minutes after the “Hour” set above, range 0-59
Custom Cron Entry:
This one can just be set if Scheduled Backup Frequency is set to “Custom“, it is used to set a custom cron entry. This option is not described in more detail in this guide.
Advanced Settings
If you click the Show Advanced Settings text at the bottom you will get some more options.
Hide the docker warning message when opening CA.Backup settings:
Can be Yes or No. Set it to “No” if you don’t want the warning popups when this plugin opens.
Select which applications to NOT stop during a backup
By default all docker applications will stop during backup. This is recommended because of reasons described in the intro to this post. However, there is no reason to stop apps that don’t have any appdata, or apps that you have excluded in the “Excluded Folders” option. Click the switch-button on the apps you don’t wont to stop during backup.
Save/Run
At the end, click “APPLY” when you want to save your configuration. Hit “BACKUP NOW” to run a manual backup.
Status and restore
When you are running backups, the progress is available in the “Backup / Restore Status” tab
There is also a “Restore” tab. I have not tried this myself, but how I understand it, it is to do a complete recovery from appdata backup. To just restore one app you have to do the process manually. The process to do that will be:
- Turn off container if running
- Manually extract the backed upp appdata folders/files to the appdata-location
- Start the container
So, at the end, this is the settings I am using in my configuration:
Sources
- https://forums.unraid.net/topic/132721-plugin-ca-appdata-backup-restore-v25/
- https://bobcares.com/blog/unraid-libvirt/