
If you use docker (apps) in UnRAID, backup of the appdata folders are essential. These folders are often in constant use by containers, so doing a normal copy-paste while the containers are running may not be the best way to do a backup. It can cause issues with files in use/changed in the middle of the backups etc, a much safer solution is to turn off the docker containers, backup the appdata-folder, then turn the containers on again. That is basically what the “Appdata Backup” does, but in a clean and easy way so you don’t have to do it all manually. It can also be scheduled.
It also have some other features, and I will go over almost all of it in this post.
This plugin requires UnRAID 6.12 and above, if you are using a older install i suggest looking at my other guide “A guide to the “CA Backup / Restore Appdata” plugin for UnRAID“.
This guide is created using “UnRAID 6.12.3” and the plugin “Appdata Backup 2023.08.16”.
Install the CA Backup / Restore Appdata plugin
If you have any apps, you probably also have the Community Apps plugin installed.
- Go to the “APPS” Tab and find Appdata Backup by Robin Kluth.
- Install the application, go to the “PLUGINS” tab and “Installed plugins” and click the logo for “Appdata Backup”
- This is where the plugin is located in the UI.
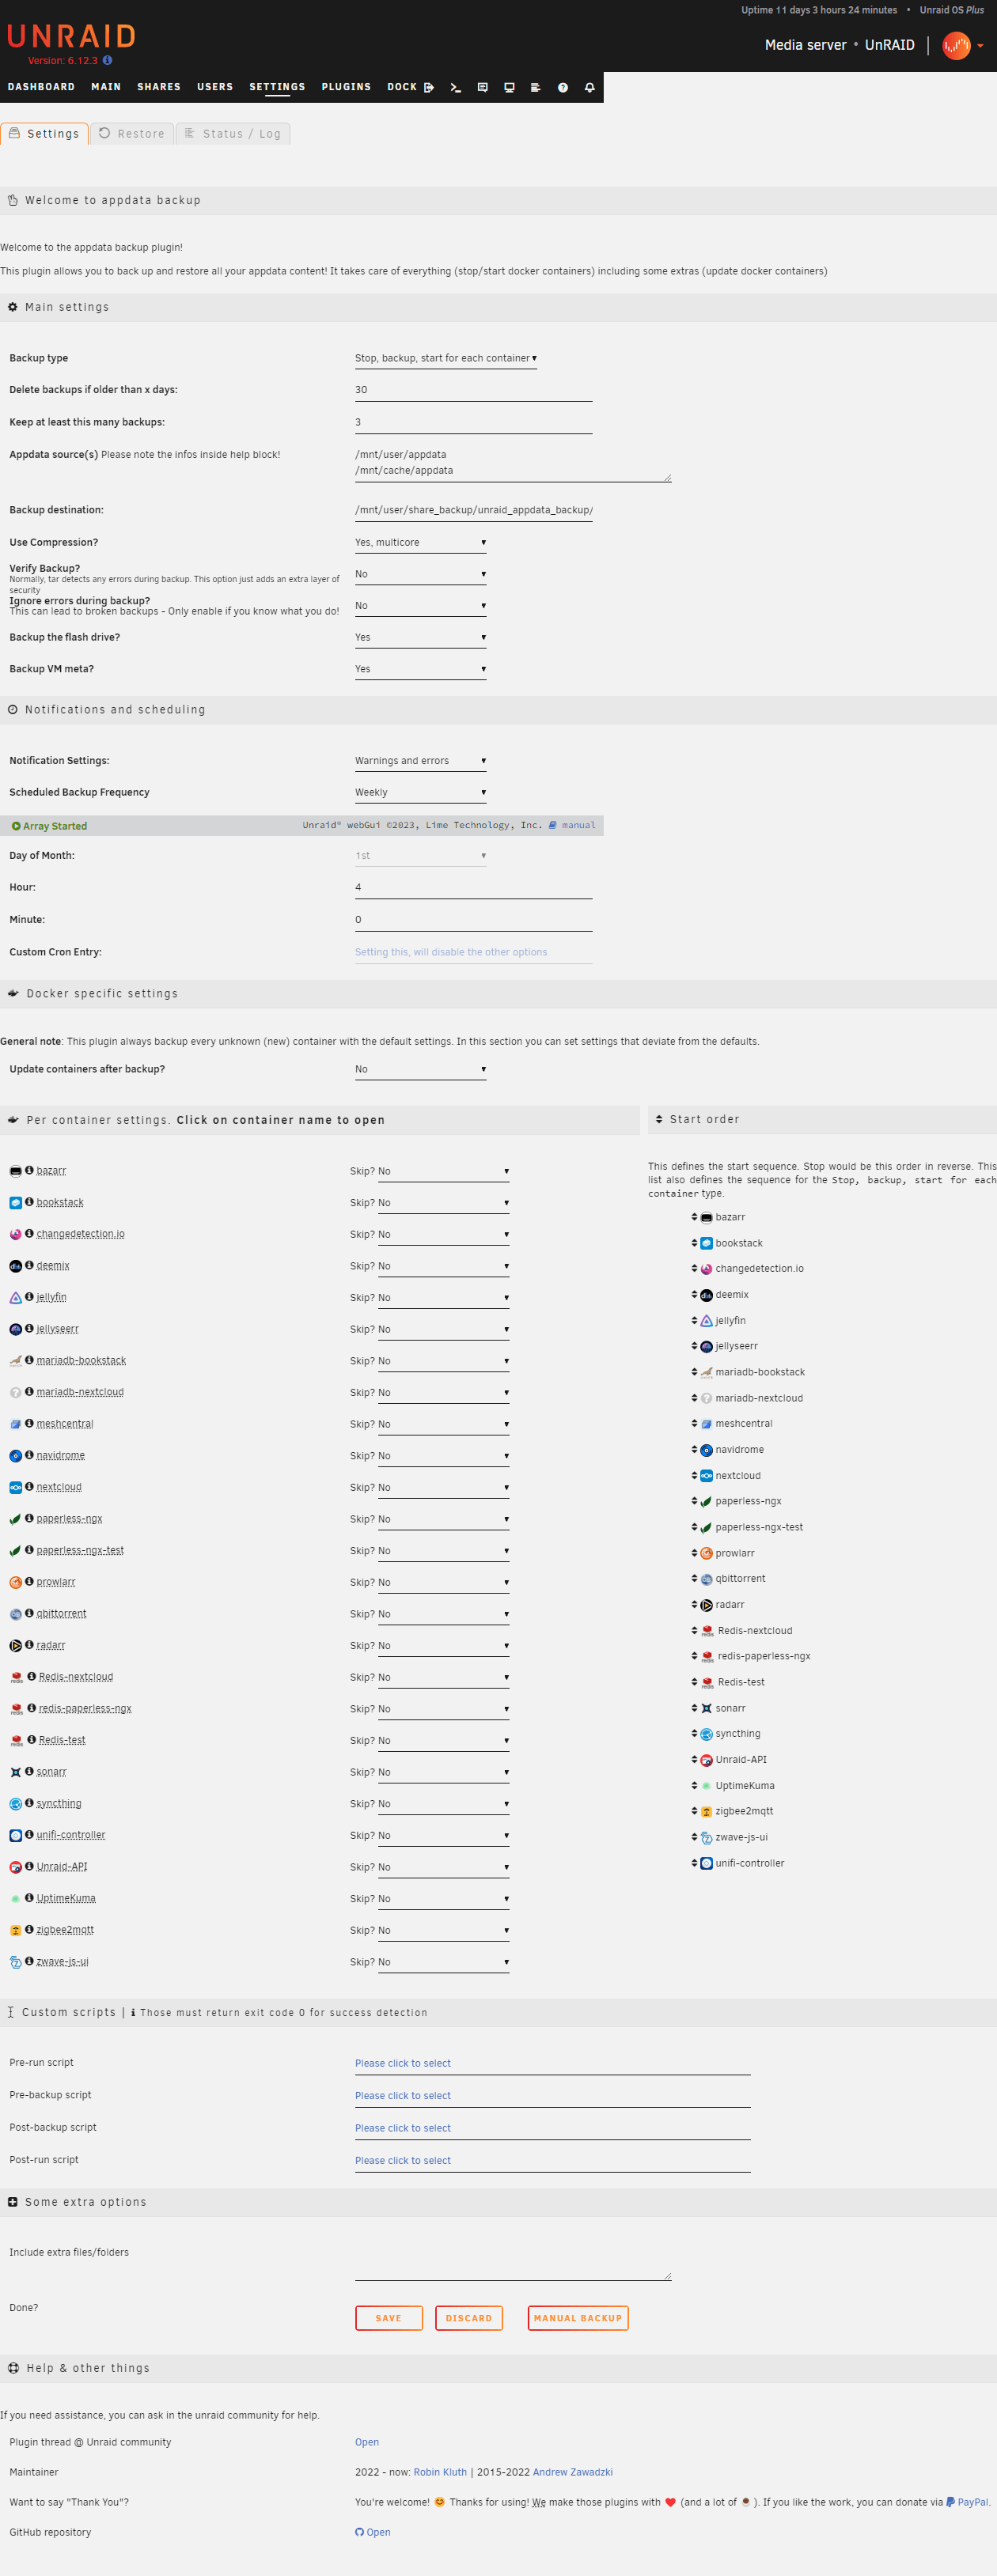
Main settings
Backup type
There it two types to choose here, both are good choices.
- “Stop all containers, backup, start all”
This one will stop all the containers first, when they are all shut down, it will backup everyone and then start the containers again. - “Stop, backup, start for each container”
This one will stop-backup-start each container in a sequence.
Delete backups if older than x days:
The plugin will delete backups older then the value set here. This setting is overridden by the setting below.
Keep at least this many backups:
This is how many backups that is always preserved, this will override the settings above. Example: If a backup is older then value of “Delete backups if older than x days”, but the value of “keep at least this many backups” is not achieved, then the backup is not deleted.
Appdata source(s)
This is where all appdata files are stored, the unraid default is /mnt/user/appdata/, but it can also be appdata files located at /mnt/cache/appdata/ if you are using a cache drive for appdata. I recommend setting both these paths (also default for the plugin) if you don’t have any custom path for appdata, if you have add these to the list of paths.
Backup destination:
This is where the backup is stored, I have the share share_backup with a folder unraid_appdata_backup, so the path is /mnt/user/share_backup/unraid_appdata_backup/. Each backup will generate a folder formated ab_YYYYMMDD_HHMMSS.
Use Compression?
Your options is “No”, “Yes, normal” and “Yes, multicore”.
Compression will make the backup take less space, but can in many cases take a longer time to complete.
The multicore-mode will use zstdmt to compress the files, and store compressed files as .tar.zst. The normal compression will use gzip and store the compressed files as .tar.gz. If there is no compression, .tar extension will be used.
I did a test, and here is a little comparison. Multicore was the clear winner in this case.
| Encryption method | Time to run backup sequense | Size of Backup folder |
| No | 2 min, 2 sec | 2.17 GB |
| Normal (gzip ) | 2 min, 58 sec | 1.99 GB |
| Multicore (zstdmt) | 1 min, 30 sec | 1.95 GB |
Verify Backup?
This is running the tar job with verify parameter as described in the tar manual 9.8 “Verifying Data as It is Stored”: linked below, this is optional. https://www.gnu.org/software/tar/manual/html_section/verify.html
Ignore errors during backup?
Can be “Yes” or “No”. If this is “Yes”, then events in category “error” will be logged as “info”, and it will be marked as successful (even with errors). Not recommended
Backup the flash drive?
Can be “Yes” or “No”. Enabling this will result in a backup off all content in the /boot folder. This is used to restore UnRAID configuration on a new USB-stick.
Backup VM meta?
Can be “Yes” or “No”. This will backup the metadata and configuration (xml) for all Virtual Machines. It Will NOT back up the VM’s. The path is /etc/libvirt/qemu.
Notifications, scheduling and retention
Notification Settings:
This choice let you decide what you will get notified about, the alternatives are “Errors Only”, “Warnings and errors” and “Disabled” (no notifications).
The options are pretty self-explanatory and down to personal preference
Scheduled Backup Frequency
This option can be set to “Disabled” (if you just want to run the backup manually), “Daily”, “Weekly”, “Monthly” or “Custom” (See Custom Cron Entity below)
Day of Week:
Only available if Scheduled Backup Frequency is set to “Weekly”, select day of the week.
Day of Month:
Only available if Scheduled Backup Frequency is set to “Monthly”, select day of the month.
Hour:
What hour in the 24-hour clock the backup should start Range 0-23
Minute:
How many minutes after the “Hour” set above, range 0-59
Custom Cron Entry:
This one can just be set if Scheduled Backup Frequency is set to “Custom“, it is used to set a custom cron entry. This option is not described in more detail in this guide.
Docker specific settings
Update containers after backup?
This part is for updating the docker images for containers when updates is available. It can be a handy function, but you may keep in mind that updates can brake things. My recommendation is to do manual updates, then can verify and troubleshoot update-related problems when they occurs.
Anyway, I have tested this function, and I am getting “No update available” even when there is, that has been my experience with multiple containers. Might be a bug?
Per container settings
In this part you can override a lot of general settings by per-container basis, you will se a list where all installed containers are listed.
Skip?
If there is a container you don’t want to backup, you can select “Yes” (Default is “No”), that way the container is not stopped, and not backed up.
Start order
This is the order of containers in the sequence, if you have preferences on the order this can be changed by moving containers up and down.
*Container name*
You can also do some configuration per container, deviating from general settings
*Container name* -> Save external volumes?
This Can be “No” (Default) or “Yes”. An external volume is paths mounted in a docker container that is not the default “appdata” path. As an example, this can be your files in the Nextcloud container, or videos in the Plex container. Above this choice both external and internal volumes is displayed.
In my opinion in most cases, backing up external volumes is better done outside this plugin, but it depends what it is of course. Keep in mind that this may require a lot of space, and take a long time to complete, compared to just backing up the appdata.
*Container name* -> Verify Backup?
Can be “Yes”, “No” or “Use Standard”. It is the same as “Verify Backup?” under “Main settings”, but let you do a custom selection for this container.
*Container name* -> Ignore errors during backup?
Can be “Yes”, “No” or “Use Standard”. It is the same as “Ignore errors during backup?” under “Main settings”, but let you do a custom selection for this container.
*Container name* -> Update container after backup?
Can be “Yes”, “No” or “Use Standard”. It is the same as “Update container after backup?” under “Docker specific settings”, but let you do a custom selection for this container.
*Container name* -> Excluded folders/files
If there is folders/files you don’t want to backup inside your selected configured shares, these can be excluded by listing them here, one line for each entry
Example: If you don’t want logs for the Bookstack container: /mnt/user/appdata/bookstack/log/
To do it easy, you can browse, check and “ADD TO LIST”.
*Container name* -> Dont stop container? NOT RECOMMENDED!
Can be “No” or “Yes”, if this on “Yes”, then the container keeps running during backup. This is generally not recommended because files can change during the backup, and the result can be a incomplete and possibly unusable backup.
Custom scripts
Pre-run script
If you want to run some own script before the addoin is doing anything, paste the path here.
Pre-backup script
If you want to run some own script before the backup is starting, paste the path here.
Post-backup script
If you want to run some own script after the backup is done, but before containers is started, paste the path here.
Post-run script
If you want to run some own script after the whole sequence is done, paste the path here.
Some extra options
Include extra files/folders
If there is something else you want to include i the backup, not included in the external/internal volumes or flash drive or vm metadata, this is your place to map it.
Done?
Click “SAVE” to Save, “Discard” to not save. After this you can do a manual run with “MANUAL BACKUP” (in addition to a potential schedule).
My settings
Last, this is how I have configured my plugin at this time:
Restore
In the restore-tab you can restore containers. I have not done a lot of testing of this myself, so I will not go into it. I might create a new guide for that at a later point.
Meanwhile, try at your own risk. I suspect it can only do a full restore and not per container. You can always do this manually by copying the files you need from the backup.
Sources
- https://forums.unraid.net/topic/55028-mntuserappdata-vs-mntcacheappdata/
- https://github.com/Commifreak/unraid-appdata.backup/
- https://forums.unraid.net/topic/137710-plugin-appdatabackup