
Even if Home-Assistant primarily is a home-automation platform, it can have many other use cases.
One is to use Home-Assistant to monitor servers and other IT stuff in the house, it is nice to have all in one place. That is why I wanted to monitor my ESXi server in Home-Assistant. In this post I will go trough my process on how I accomplished it.
I used a Windows server to do the PowerShell-part, but both PowerShell (From v6 “core”) and PowerCLI are Linux compatible. So it should also work directly in Linux. I might migrate it later as I already have Home-Assistant running on a Ubuntu Server. But for now, Windows Server 2016.
So this is a illustration on how it will work:

VMware PowerCLI Installation
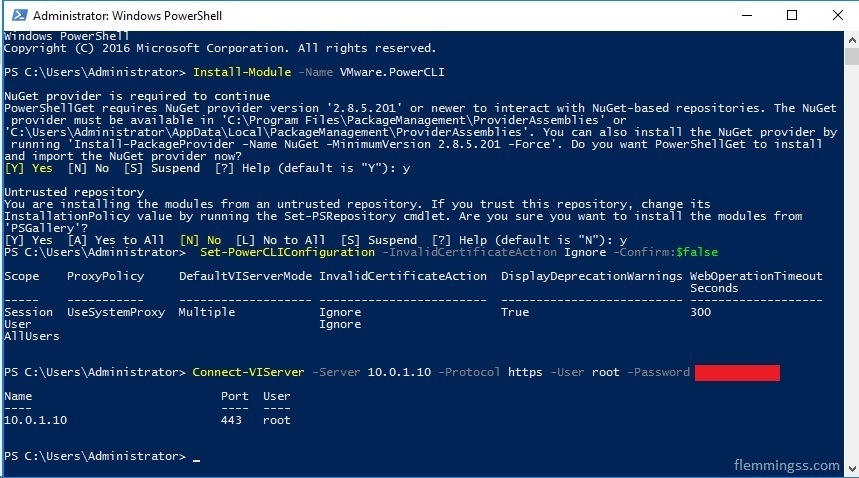
First I installed VMware PowerCLI. This Module can be downloaded here, but can also be installed directly in PowerShell by running this command:Install-Module -Name VMware.PowerCLI
Because I don’t have a valid certificate I had to ignore that before I was able to connect to the server, for that I used this command:Set-PowerCLIConfiguration -InvalidCertificateAction Ignore -Confirm:$false
After this I was allowed to connect by using this command:Connect-VIServer -Server 10.0.1.10 -Protocol https -User root -Password ******
Home-Assistant Entity Component Selection
To interact with the Home-Assistant API I used the Home-Assistant-PowerShell-Module.
Since I did not find any useful integrations in Home-Assistant that can hold numeric values set by the API I found two custom components that let me do this.
The first one I tried was hass-variables, but I ended up using home-assistant-variables because this one supported unit_of_measurement directly, with looks better in the GUI. It also had some other nice features. Else then that both worked ok, and I was able to install them using HACS.
Here is some examples on how these custom components work with the Home-Assistant-PowerShell-Module.
hass-variables
PowerShell
# Authenticate with Home-Assistant
New-HomeAssistantSession -ip $ha_ip -port $ha_port -token $ha_access_token
# Set value to send
$updated_value = "25"
# Format JSON
$json_to_send = '{"variable":"the_name_of_entity","value":' + '"' +  "$updated_value" + '"' + '}'
# Send to Home-Assistant
Invoke-HomeAssistantService -service variable.set_variable -json $json_to_send
configuration.yaml
variable:
  the_name_of_entity:
    value: 0
    attributes:
      friendly_name: 'This is the value'
home-assistant-variables
PowerShell
# Authenticate with Home-Assistant
New-HomeAssistantSession -ip $ha_ip -port $ha_port -token $ha_access_token
# Set value to send
$updated_value = "25"
# Format JSON
$json_to_send = '{"entity_id":"var.the_name_of_entity","value":' + '"' +  "$updated_value" + '"' + '}'
# Send to Home-Assistant
Invoke-HomeAssistantService -service var.set -json $json_to_send
configuration.yaml
var:
  the_name_of_entity:
    friendly_name: "This is the value"
    initial_value: 0
Another good thing about this component is that it supports template. It can even be configured to update when one, or more other entities gets updated. Very useful!
var:
  the_name_of_entity_plus_one:
    friendly_name: "This is the value +1"
    value_template: "{{ ( (states.var.the_name_of_entity.state | float ) +1 ) }}"
    tracked_entity_id:
      - var.the_name_of_entity
Input Text
For text values Home-Assistant already had a good enough component, Input Text.
PowerShell
# Authenticate with Home-Assistant
New-HomeAssistantSession -ip $ha_ip -port $ha_port -token $ha_access_token
# Set value to send
$updated_value = "25"
# Format JSON
$json_to_send = '{"entity_id":"input_text.the_name_of_entity","value":' + '"' +  "$updated_value" + '"' + '}'
# Send to Home-Assistant
Invoke-HomeAssistantService -service var.set -json $json_to_send
configuration.yaml
input_text:
  the_name_of_entity:
    name: "This is the value"
Getting data from ESXI
After some research and exploration I ended up with a collection of useful parameters.
Listed below are all PowerCLI commands I used formatted as on-liners. In my script I formatted them in a more reusable-friendly way.
In the script I also closed the connection to avoid multiple sessions with this command:Disconnect-VIServer -confirm:$false ($false result in no asking for confirmation)
- Host CPU usage in MHz:
(Get-VMhost | Select-Object CpuUsageMhz).CpuUsageMhz - Host total CPU in MHz:
(Get-VMhost | Select-Object CpuTotalMhz).CpuTotalMhz - Host memory usage in MB:
(Get-VMhost | Select-Object MemoryUsageMB).MemoryUsageMB - Host memory usage in MB:
[math]::Round((Get-VMhost | Select-Object MemoryTotalMB).MemoryTotalMB)
Rounded this last one because it had a 6-digit decimal for some reason. - Host uptime in total Seconds
(Get-VMHost | Get-View | select Name, @{N="Uptime"; E={(Get-Date) - $_.Summary.Runtime.BootTime}}).Uptime.TotalSeconds
Insted of collecting more human-friendly values from ESXi I decided to just calculate it it Home-Assistant by template later. This way I get away with a few less API-calls. - Datastore free space in GB
[Math]::Truncate((Get-Datastore | Where-Object {$_.Name -eq "NameOfDataStore"} | Select-Object FreeSpaceGB).FreeSpaceGB*100)/100 - Datastore total space in GB
[Math]::Truncate((Get-Datastore | Where-Object {$_.Name -eq "NameOfDataStore"} | Select-Object CapacityGB).CapacityGB*100)/100
UsedTruncateto cut of decimals in the above two examples because rounding resulted in some mathematical problems when I made a template calculation based on these two later. - VM avg CPU usage in percent
(Get-Stat -Entity "NameOfVM" -Start (Get-Date).AddMinutes(-30) -ErrorAction SilentlyContinue | Group-Object -Property {$_.Entity.Name} | Select @{N='CPU(%)';E={"{0:N1}" -f ($_.Group | where{$_.MetricId -eq 'cpu.usage.average'} | Measure-Object -Property Value -Average | select -ExpandProperty Average)}})."CPU(%)" - VM avg memory usage in percent
(Get-Stat -Entity "NameOfVM" -Start (Get-Date).AddMinutes(-30) -ErrorAction SilentlyContinue | Group-Object -Property {$_.Entity.Name} | Select @{N='Memory(%)';E={"{0:N1}" -f ($_.Group | where{$_.MetricId -eq 'cpu.usage.average'} | Measure-Object -Property Value -Average | select -ExpandProperty Average)}})."Memory(%)" - VM avg network usage in KB/s
(Get-Stat -Entity "NameOfVM" -Start (Get-Date).AddMinutes(-30) -ErrorAction SilentlyContinue | Group-Object -Property {$_.Entity.Name} | Select @{N='Net(KBps';E={"{0:N1}" -f ($_.Group | where{$_.MetricId -eq 'cpu.usage.average'} | Measure-Object -Property Value -Average | select -ExpandProperty Average)}})."Net(KBps" - VM avg disk usage in KB/s
(Get-Stat -Entity "NameOfVM" -Start (Get-Date).AddMinutes(-30) -ErrorAction SilentlyContinue | Group-Object -Property {$_.Entity.Name} | Select @{N='Disk(KBps)';E={"{0:N1}" -f ($_.Group | where{$_.MetricId -eq 'cpu.usage.average'} | Measure-Object -Property Value -Average | select -ExpandProperty Average)}})."Disk(KBps)"
In above examples ErrorAction SilentlyContinue are used because it will throw an error if the data is not available (VM not running etc). - VM power state
(Get-VM | Where-Object {$_.Name -eq "NameOfVM"} | Select-Object PowerState).PowerState
This will return PoweredOff, PoweredOn or Suspended.
From PowerShell to Home-Assistant entities
This part requires the Home-Assistant-PowerShell-Module to be loaded, and this command to be run: New-HomeAssistantSession -ip 10.0.24.4 -port 8123 -token eyYfo49g036gdKg5LSki4w04tkifulaglgkMn3idnf2w57x5eyfog036gdKg5LSkgw04tkifulaglgkMidnf2w57axyYfo49g036gdKLSkgi4w04tkifaglgkMn3idnf2w57axyYfo49g036gdKg5LSkgi4w04tkifulaglgkMn3idnf2w57ax5
Replace IP, Port and Token.
If you don’t know how to generate the token there is an explanation in the top of this post:
🡆 How to use Tasker with Home-Assistant 🡄
To avoid a lot of copy/paste and a unnecessary long script I stored entity names and value variables in hash tables that I used in foreach-loops. One table/loop for each kind of entity type.
In both loops I sat empty values to 0 because I would rather have that in my Home-Assistant entities insted of nothing where no value is obtainable. Not necessary, but I think it looks better. Then I updated the correct sensor in Home-Assistant with the new value.
I used the code below to update all the home-assistant-variables (var.name). I used this component to store all the numeric values.
$var_to_ha_hash_table = @{
    "var.entity_name_1" = $value_1
    "var.entity_name_2" = $value_2
    "var.entity_name_3" = $value_3
}

#Sending info in above hash table to Home-Assistant
foreach($var_entity in $var_to_ha_hash_table.GetEnumerator())
{

    $var_entity_key = ($var_entity).key
    $var_entity_value = ($var_entity).value

    if ($var_entity_value -eq $null) {$var_entity_value = 0}

    $json_to_send = '{"entity_id":' + '"' +  "$var_entity_key" + '",' + '"value":' + '"' +  "$var_entity_value" + '"' + '}'
    Invoke-HomeAssistantService -service var.set -json $json_to_send
    Clear-Variable -Name json_to_send
}
For the text-based values I used the built-in component Input Text (input_text.name).
$input_text_to_ha_hash_table = @{
    "input_text.entity_name_1" = $value_1
    "input_text.entity_name_2" = $value_2
    "input_text.entity_name_3" = $value_3
}

foreach($input_text_entity in $input_text_to_ha_hash_table.GetEnumerator())
{

    $input_text_entity_key = ($input_text_entity).key
    $input_text_entity_value = ($input_text_entity).value

    if ($input_text_entity_value -eq $null) {$input_text_entity_value = 0}

    $json_to_send = '{"entity_id":' + '"' +  "$input_text_entity_key" + '",' + '"value":' + '"' +  "$input_text_entity_value" + '"' + '}'
    Invoke-HomeAssistantService -service input_text.set_value -json $json_to_send
    Clear-Variable -Name json_to_send

}
My full PowerShell script can be found here.
🡆 Download esxi_to_home-assistant.ps1 🡄
Home-Assistant Entities
In total I made 40 different entities in Home-Assistant to hold values, where 9 of these are calculated, the rest is updated by the PowerShell script. It is to much to list up here, but complete configuration.yaml can be found here.
🡆 Download configuration.yaml 🡄
But i want to explain some of them (most of them works the same way anyway):
“input_text” entities updated by PowerShell Script
These are formatted like the example below. initial Is the field that is updated. I have “Unknown” as startup-value.
input_text:
  esxi_vm_admin_server_powerstate:
    name: Admin-Server VM PowerState
    initial: Unknown
“var” entities updated by PowerShell Script
These are formatted like the example below. initial_value Is the field that is updated. I have 0 as startup-value.
var:
  esxi_cpu_usage_mhz:
    friendly_name: "ESXI CPU Usage MHz"
    initial_value: 0
    unit_of_measurement: 'MHz'
    icon: mdi:cpu-64-bit
“var” entities updated by template
These entities is just calculations based on values from other entities. When one of the entities listed in tracked_entity_id are updated this entity also update.
The updated value is based on Jinja2 code in value_template.
In the below example CPU usage percent is calculated by MHz usage / MHz total * 100 then rounded to two decimals.
  esxi_cpu_usage_pct:
    friendly_name: "ESXI CPU Usage %"
    initial_value: 0
    unit_of_measurement: '%'
    icon: mdi:cpu-64-bit
    value_template: "{{ (states.var.esxi_cpu_usage_mhz.state | float / states.var.esxi_cpu_total_mhz.state | float * 100) | round(2)}}"
    tracked_entity_id:
      - var.esxi_cpu_usage_mhz
      - var.esxi_cpu_total_mhz
For the uptime sensors only var.esxi_uptime_total_seconds are updated by the PowerShell Script. And because seconds are very hard to read for humans, other entities calculates the more readable Days, Hours, Mins, Secs format
Template for calculating days from total seconds:
{{ ( (states.var.esxi_uptime_total_seconds.state | float / 86400 )) | int }}
Template for calculating hours from total seconds:
{{ ( (states.var.esxi_uptime_total_seconds.state | float / 3600) % 24 ) | int }}
Template for calculating minutes from total seconds: {{ ( (states.var.esxi_uptime_total_seconds.state | float % 3600 ) / 60 ) | int }}
Template for calculating seconds from total seconds:
{{ ( (states.var.esxi_uptime_total_seconds.state | float ) % 60 ) | int }}
If you also want to include weeks, you have to add this to calculate weeks:{{ ( (states.var.esxi_uptime_total_seconds.state | float / 86400 ) /7 ) | int }}
and replace the days-template whit this:{{ ( (states.var.esxi_uptime_total_seconds.state | float / 86400 ) % 7 ) | int }}
Impotent: These templates don’t output the total number of specific unit, they output what’s the rest after the higher time unit is accounted for. For example If the uptime is 1500 total minutes, the hours will be 1 and days will be 1. (1500 total minutes are 25 totalt hours).
Lovelace
Insted of having a 40 entities long list of sensors I I decided to make a markdown card with I will say was a better solution for this purpose.
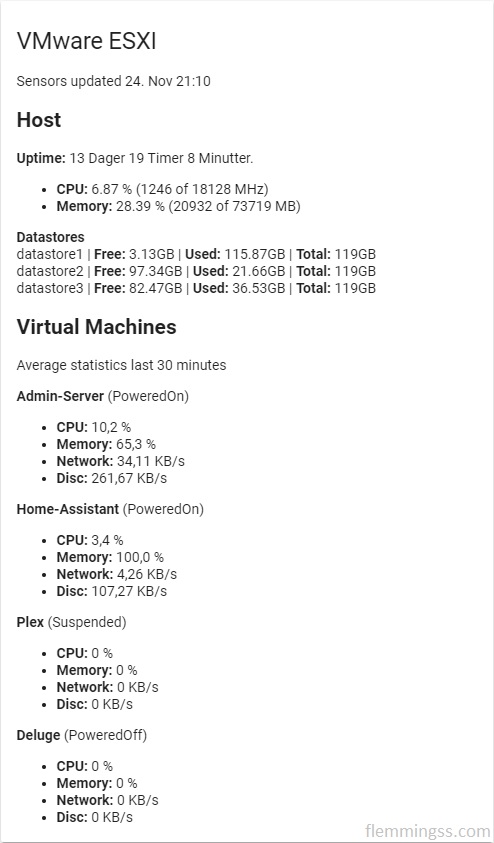
All the content of the above Markdown Card:
{{ as_timestamp(states.var.esxi_uptime_total_seconds.last_updated) | timestamp_custom('Sensors updated %-d. %b %H:%M')}}
<h2>Host</h2>

**Uptime:** {% if (states.var.esxi_uptime_days.state | float) >= 1 %} {{ ( states.var.esxi_uptime_days.state ) }} Dager{% endif %}{% if (states.var.esxi_uptime_hours.state | float) >= 1 %} {{ ( states.var.esxi_uptime_hours.state ) }} Timer{% endif %}{% if (states.var.esxi_uptime_minutes.state | float) >= 1 %} {{ ( states.var.esxi_uptime_minutes.state ) }} Minutter{% endif %}.

- **CPU:** {{ states("var.esxi_cpu_usage_pct") }} % ({{ states("var.esxi_cpu_usage_mhz") }} of {{ states("var.esxi_cpu_total_mhz") }} MHz)
- **Memory:** {{ states("var.esxi_memory_usage_pct") }} % ({{ states("var.esxi_memory_usage_mb") }} of {{ states("var.esxi_memory_total_mb") }} MB)

**Datastores**
datastore1 | **Free:** {{ states("var.esxi_datastore1_space_free_gb") }}GB | **Used:** {{ states("var.esxi_datastore_1_space_used_gb") }}GB | **Total:** {{ states("var.esxi_datastore1_space_total_gb") }}GB
datastore2 | **Free:** {{ states("var.esxi_datastore2_space_free_gb") }}GB | **Used:** {{ states("var.esxi_datastore_2_space_used_gb") }}GB | **Total:** {{ states("var.esxi_datastore2_space_total_gb") }}GB
datastore3 | **Free:** {{ states("var.esxi_datastore3_space_free_gb") }}GB | **Used:** {{ states("var.esxi_datastore_3_space_used_gb") }}GB | **Total:** {{ states("var.esxi_datastore3_space_total_gb") }}GB
<h2>Virtual Machines</h2> Average statistics last 30 minutes

**Admin-Server** ({{ states("input_text.esxi_vm_admin_server_powerstate")}})
- **CPU:** {{ states("var.esxi_vm_admin_server_avg_cpu_usage_pct") }} %
- **Memory:** {{ states("var.esxi_vm_admin_server_avg_memory_usage_pct")}} %
- **Network:** {{ states("var.esxi_vm_admin_server_avg_net_usage_kbps") }} KB/s
- **Disc:** {{ states("var.esxi_vm_admin_server_avg_disk_usage_kbps") }} KB/s

**Home-Assistant** ({{ states("input_text.esxi_vm_home_assistant_powerstate") }})
- **CPU:** {{ states("var.esxi_vm_home_assistant_avg_cpu_usage_pct") }} %
- **Memory:** {{ states("var.esxi_vm_home_assistant_avg_memory_usage_pct") }} %
- **Network:** {{ states("var.esxi_vm_home_assistant_avg_net_usage_kbps") }} KB/s
- **Disc:** {{ states("var.esxi_vm_home_assistant_avg_disk_usage_kbps") }} KB/s

**Plex** ({{ states("input_text.esxi_vm_plex_powerstate") }})
- **CPU:** {{ states("var.esxi_vm_plex_avg_cpu_usage_pct") }} %
- **Memory:** {{ states("var.esxi_vm_plex_avg_memory_usage_pct") }} %
- **Network:** {{ states("var.esxi_vm_plex_avg_net_usage_kbps") }} KB/s
- **Disc:** {{ states("var.esxi_vm_plex_avg_disk_usage_kbps") }} KB/s

**Deluge** ({{ states("input_text.esxi_vm_deluge_powerstate") }})
- **CPU:** {{ states("var.esxi_vm_deluge_avg_cpu_usage_pct") }} %
- **Memory:** {{ states("var.esxi_vm_deluge_avg_memory_usage_pct") }} %
- **Network:** {{ states("var.esxi_vm_deluge_avg_net_usage_kbps") }} KB/s
- **Disc:** {{ states("var.esxi_vm_deluge_avg_disk_usage_kbps") }} KB/s
PowerShell script execution
In Windows the best way to run the script repeatable to keep Home-Assistant up to date is to use the built in WindowsTask Scheduler, I have set it to run every 5 minutes. A complete guide for this can be found here:
🡆 How to run PowerShell scripts with Windows Task Scheduler 🡄
Thats it.
Next step might be to control the VMs from Home-Assistant, but that will be a future project.
Sources
- http://techgenix.com/use-powercli-quick-stats-part1
- https://www.ivobeerens.nl/2018/07/18/quick-tip-powercli-invalid-server-certificate-error
- https://pubs.vmware.com/vsphere-50/index.jsp?topic=%2Fcom.vmware.powercli.cmdletref.doc_50%2Findex.html
- https://code.vmware.com/forums/2530/vsphere-powercli#573480
- https://community.home-assistant.io/t/multiply-sensor-value-with-another-value/15476/7
- https://community.home-assistant.io/t/convert-seconds-to-days-hours-minutes/23152/23
- https://jinja.palletsprojects.com/en/master/templates/#math
- https://docs.exponea.com/docs/jinja-syntax
- https://community.idera.com/database-tools/powershell/ask_the_experts/f/learn_powershell_from_don_jones-24/19878/select-only-two-decimal-places-not-round
- https://community.home-assistant.io/t/last-updated-state-and-last-changed-in-lovelave/101701/15
- https://community.home-assistant.io/t/timestamp-formatting/77731