A few weeks ago, after some trial and error, I finally managed to find a good solution for uploading and storing recordings from my Reolink surveillance cameras.
Now that I have a satisfactory solution, I have made this guide. This method (The UnRAID part) will probably also apply to other camera brands with FTP-upload support.
In this guide I will show you how to set up and configure Reolink IP-cameras to record on motion and save the footage to an UnRAID-server trough FTP. I will also include how to automatically delete the old footages after a after a certain number of days.
The benefit of doing this rather than using NVR software like Shinobi, Blue Iris or one of the other alternatives is to limit the resource consumption on the network and the UnRAID server. This way the cameras will do all the hard work, and he network will just be loaded when an upload occurs.
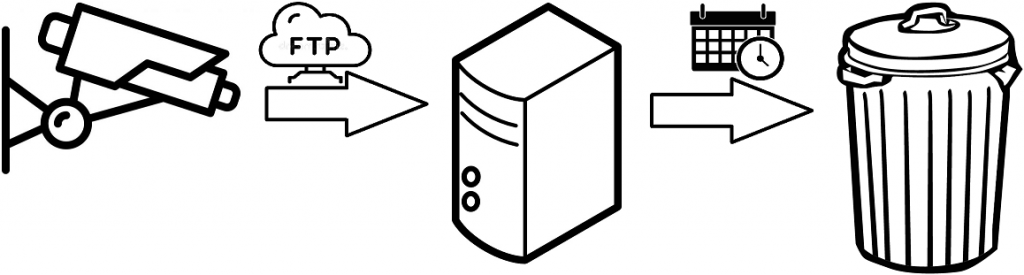
The picture below is illustrating the process:
Security camera detect motion and starts recording → transferring files trough FTP to UnRAID → Deleteing files after X days
I will assume that you have set up and done the basic configuration for both UnRAID (A working array and a static IP) and the Reolink Camera(s).
UnRAID FTP/User/Share Configuration
- Create a new share for surveillance camera footage.
Go to SHARES and click ADD SHARE. Give it a Share name (Example: surveillance_camera) and click ADD SHARE.
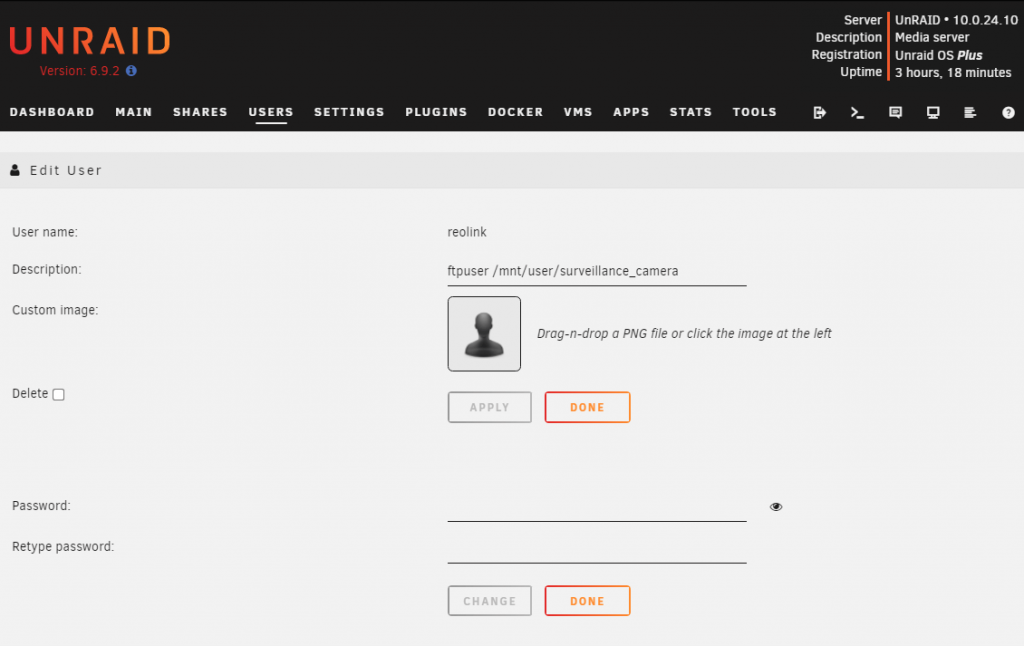
The normal Security and User access settings don’t apply for FTP-users, so these settings don’t matter for the cameras. - Create a new user for FTP-access.
Go to USERS and click ADD USER. Give it a Username (Example: reolink) and a password.
In Description writeftpuser /mnt/user/<share name>. This part is important because this is not just a description, in this case the field is used by the daemon start script to allow access to that specific share.
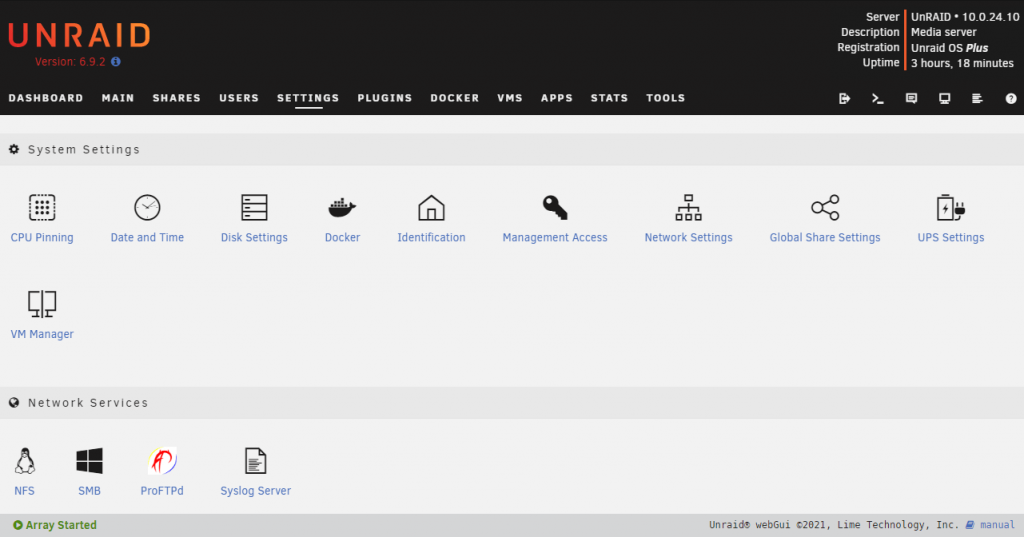
- Install and start the ProFTPD Plugin
Go to APPS (Community Applications required) and search for ProFTPd by SlrG. Install it.
When successful go to SETTINGS and click ProFTPd under “Network Services”.
Below Configuration: set Enable ProFTPd: to Yes and Click APPLY. Status: should now be RUNNING.
Settings 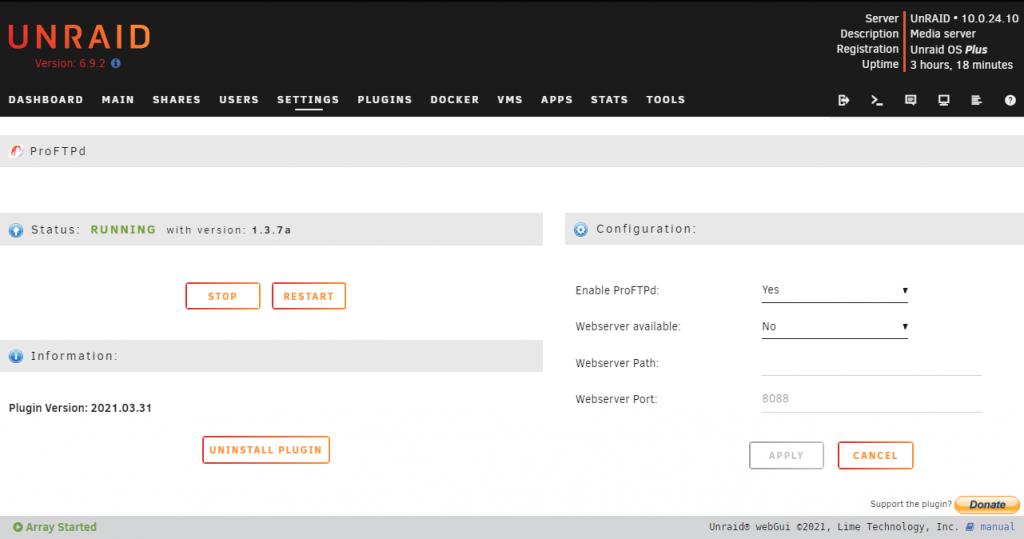
ProFTPd


Reolink Camera Configuration
Do these steps for all Reolink IP-Cameras:
- Go to the IP-Camera’s web interface (The Windows App also works). The address is
http:/<IP>/. - Log in to the camera and click the gear-icon to open Settings.
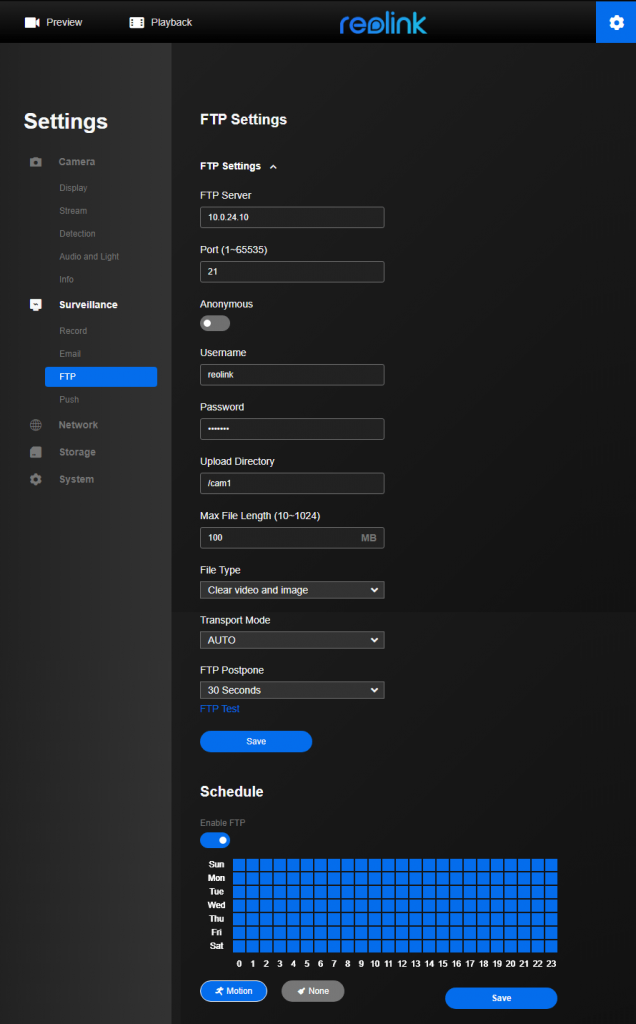
- Select Surveillance and FTP, then expand FTP Settings.
Fill out as listed below and keep the rest as default:
FTP server: <UnRAID serer IP>
Username: <The FTP-Username>
Password: <The FTP-User’s Password>
Upload Directory: <Share directory> (Directory relative to /mnt/user/<share name>). Add just/to use just the root folder, or/cam1ect to make a folder for the camera (I recommend this if you have more then one camera) - Click FTP Test to test the connection, wait for the “Succeeded” message.
The Test will create a folder and a file on the FTP server.
Example: ftp_test20210909095108\test20210909095109.txt Content: “This is a test file sent by user reolink .” - Click Save right below and the the camera will now send recorded footage to the FTP server.
Automatically remove old footage from UnRAID
To prevent the disks from filling up more than necessary it is recommended to set up a automatic scheduled deletion of the old footage. This can be achieved with a script.
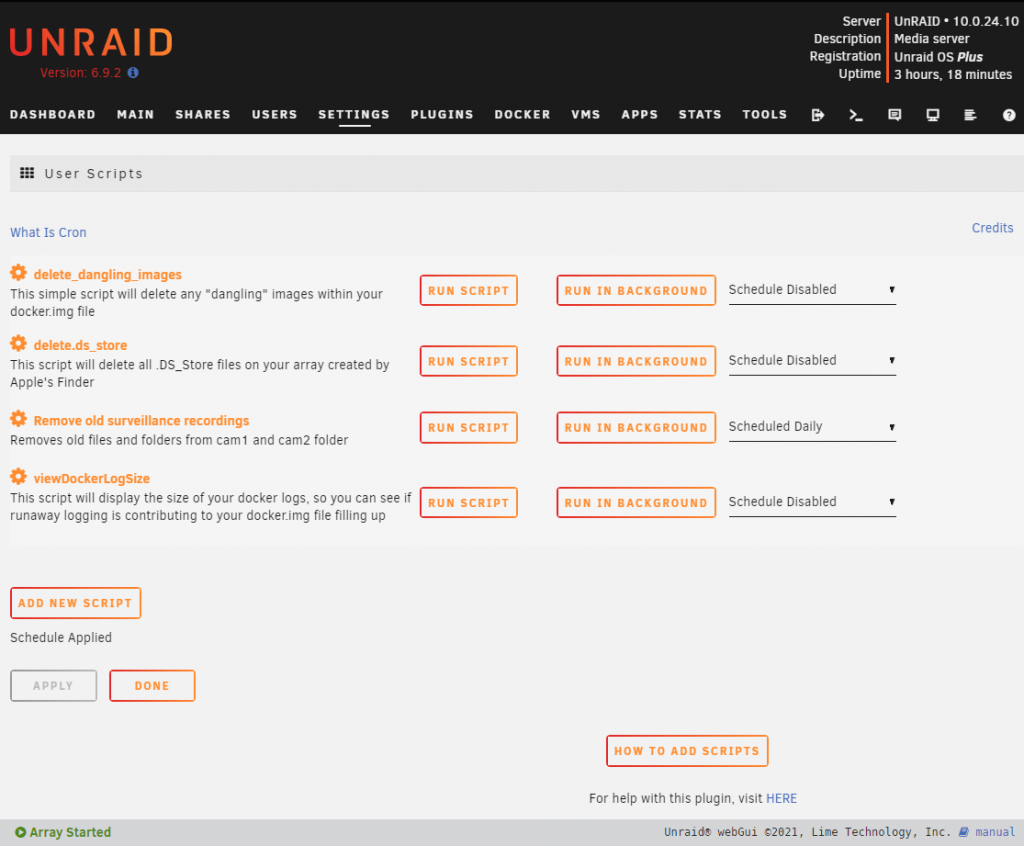
- Install the “User Scripts” plugin.
Go to APPS (Community Applications required) and search for User Scripts by Andrew Zawadzki/Squid. Install it. - Use a file browser (Like Windows Explorer) and navigate to
\flash\config\plugins\user.scripts\scripts\on the UnRAID server. Here create a new folderremove_old_surveillance_recordings, and inside it a new file calledscript(no filename suffix) - Inside the script file paste the following:
#!/bin/bash
#name=Remove old surveillance recordings
#description=Removes old files and folders from cam1 and cam2 folder
#arrayStarted=true
find /mnt/user/surveillance_camera/cam1 -type f -mtime +3 -delete
find /mnt/user/surveillance_camera/cam1 -type d -empty -delete
find /mnt/user/surveillance_camera/cam2 -type f -mtime +3 -delete
find /mnt/user/surveillance_camera/cam2 -type d -empty -delete
- Edit the file as follow to customize it for your setup:
cam1andcam2are examples of Upload Directory from he Reolink FTP-Settings. Change if different.surveillance_camerais the name of he share. Change if different.-type f -mtime +3 -deleteremoves files older 3 days, This value “3” can be changed to preference.-type d -empty -deleteremoves all empty subfolders (where files are deleted)
Add additional lines for additional cameras.
Save the file when done. - In the UnRAID GUI navigate to SETTINGS and click User Scripts under “Utilities”.
- The script Remove old surveillance recordings should now be listed, Right for it select Scheduled Daily in the drop-down and click APPLY. The message “Schedule Applied” will appear.
- The script will now run once a day, to run it immediately click RUN SCRIPT and DONE. The UnRAID log will show it like this:
Sep 15 12:28:38 UnRAID emhttpd: cmd: /usr/local/emhttp/plugins/user.scripts/startScript.sh /tmp/user.scripts/tmpScripts/remove_old_surveillance_recordings/script
I hope this was clear and useful.