
If you are reading this you are probably considering running ZWavejs2MQTT as a Z-Wave gateway/bridge for Home-Assistant.
I did the same, and documented al the steps in this guide.
This tutorial applies both to new installs and Z-Wave migrations.
So, why not use the built-in Z-Wave functionality in Home-Assistant? Here is some scenarios where a separate gateway is useful:
- If you want to reboot the Home-Assistant server whiteout waiting for the Z-Wave network initializing every time.
- If you want the Z-Wave interface in another physical location
- If you are virtualize Home-Assistant and don’t want to deal with USB-pass-through.
- If you want multiple systems or Home-Assistant instances to communicate with the Z-Wave network.
And there is properly a lot of more reasons.
Requirements/preparations
In this guide I will use a Raspberry Pi 3 Model B+ and a Z-Wave.me UZB1 usb-interface.
But this will also work with RaZberry Pi-Hat and the hardware can be almost anything that can run Linux.
MQTT Broker
Before following this guide you will need a MQTT broker and MQTT configured with auto discovery in Home-Assistant. If this is in place you can ignore this step.
The easiest way to set this up is with the Mosquitto Add-On in Home-Assistant.
- Go to Supervisor -> Add-on Store
- Select Mosquitto broker under Official add-ons
- Click INSTALL
- Click START
- Go to Configuration -> Integrations.
- MQTT will show as “Discovered” (If not add a new integration and search for “MQTT”).
- Select CONFIGURE
Done.
Raspberry Pi setup
Set up a Raspberry Pi with for example Raspbian Buster.
https://www.raspberrypi.org/software/operating-systems/
To flash the image to your SD-card download and install/run Etcher
Download Etcher here: https://www.balena.io/etcher
After installation insert the SD-card in your computer and start Etcher.
Press Select image and select the Raspbian Stretch image file.
Then click Select drive and select your SD-Card.
Click Flash! and wait until finish.
After flashing, if the boot partition is not showing on your computer, eject and re-insert the card in the computer. Boot partition should now be accessible. To enable SSH by default make a new, empty file with no extension named ssh in the root of the boot partition.
In Windows this is done by running type NUL >> G:\ssh in CMD (Replace G with partition letter.). Verify that file is created and eject SD-Card.
Now connect your Z-Wave interface to the Raspberry Pi and Insert the SD-card. Connect the Raspberry Pi to your router with an Ethernet cable and then connect the power supply.
SSH into your Pi. If your Z-Wave interface is USB you can see it by running lsusb.

Make sure your system is up-to-date by running:
sudo apt update
sudo apt upgrade
Install Docker
ZWavejs2MQTT will run as a container, so Docker must be installed first.
Run these command to install Docker:
cd ~
curl -fsSL https://get.docker.com -o get-docker.sh
sudo sh get-docker.sh
sudo usermod -aG docker pi
sudo apt install python3
sudo apt install python3.pip
sudo pip3 -v install docker-compose
Install ZWavejs2MQTT
ZWavejs2MQTT can now be downloaded by running these commands:
cd ~
mkdir zwavejs2mqtt
cd zwavejs2mqtt
curl -fsSL https://raw.githubusercontent.com/zwave-js/zwavejs2mqtt/master/docker/docker-compose.yml -o docker-compose.yml
docker-compose.yml might not be necessary to edit. But if you need to change the default device from /dev/ttyACM0 you can edit the file by running the following command:
nano docker-compose.ymlIf you are using a USB-stick /dev/ttyACM0 is probably correct, if you are using a Pi-Hat, change it it to /dev/ttyAMA0.
This is the default content :
version: '3.7'
services:
  zwavejs2mqtt:
    container_name: zwavejs2mqtt
    image: zwavejs/zwavejs2mqtt:latest
    restart: always
    tty: true
    stop_signal: SIGINT
    networks:
      - zwave
    devices:
      - '/dev/ttyACM0:/dev/ttyACM0'
    volumes:
      - ./store:/usr/src/app/store
    ports:
      - '8091:8091'
networks:
  zwave:
# volumes:
#   zwavejs2mqtt:
#     name: zwavejs2mqtt
Press CTRL+X to exit and Y to save. Press Enter to Confirm file/location.
Then set up the container to run in the background by running this command:
sudo docker-compose up -dInstallation complete, the container should now also start after reboots.
ZWavejs2MQTT is now accessible by navigating a browser to http://<ip>:8091/
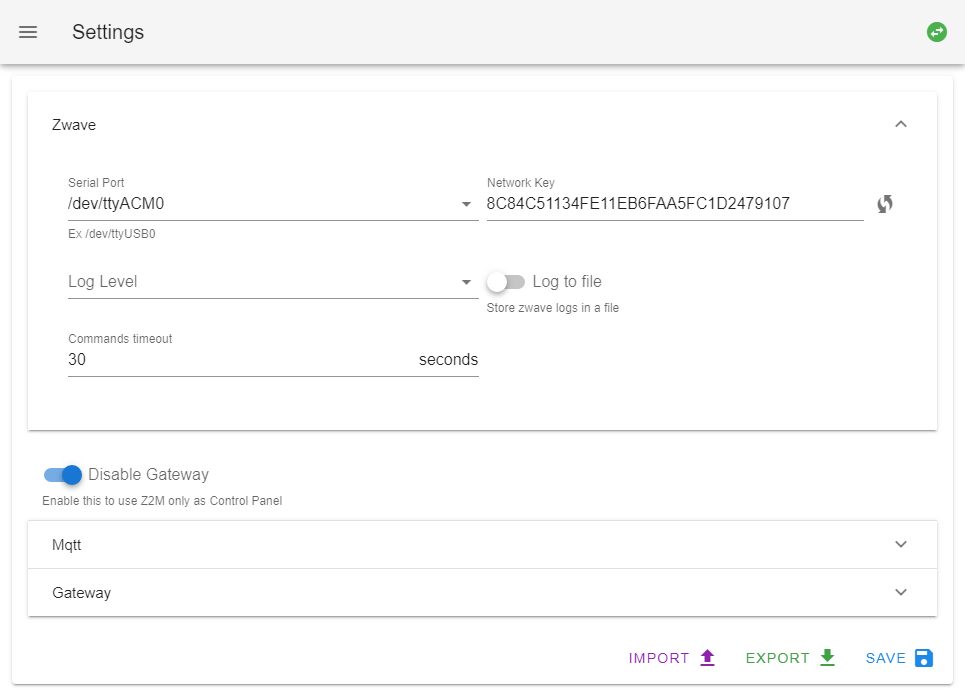
Settings: Zwave
Open up the web-GUI by going to http://<ip>:8091/ and select Settings in the left-menu.
Expand Zwave and fill out:
- Serial Port
This is normally/dev/ttyACM0if you use a USB-Interface for Z-Wave, or/dev/ttyAMA0if you are using a Pi Hat with Z-Wave - Network Key
If you are migrating from another controller with secure nodes insert your network key her, if not generate a new key with the refresh-symbol.
Migrating non-secure nodes does not require a Network Key. - Commands timeout
30 seconds (I don’t know what’s best practice value here) - Activate Disable Gateway (temporary) and click SAVE
Control Panel
Open Control Panel from the left menu to see the Z-Wave Network Nodes (If you have nodes yet, else you will just see the controller). It can take some time for the information to be visible.
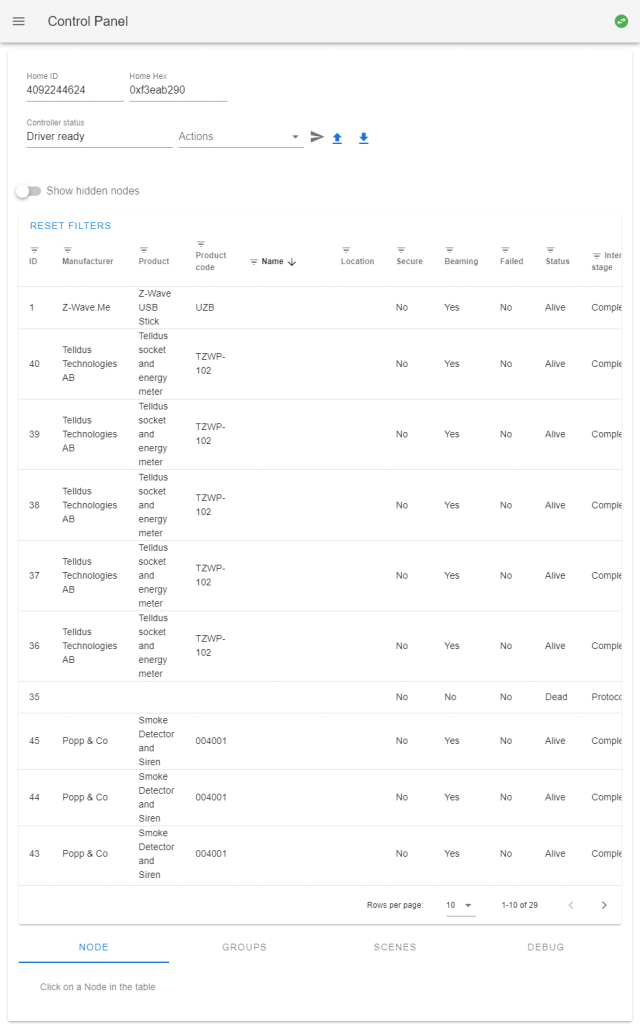
Here you can select Start inclusion under Actions, and then > to include new nodes.
If you select a node you can scroll down to the bottom and view/control it, you can also change Node Name and Location. I recommend giving them a meaningful name.
In my system I rename all my nodes to zwave_<number>.and document what is what in a separate Google spreadsheet.
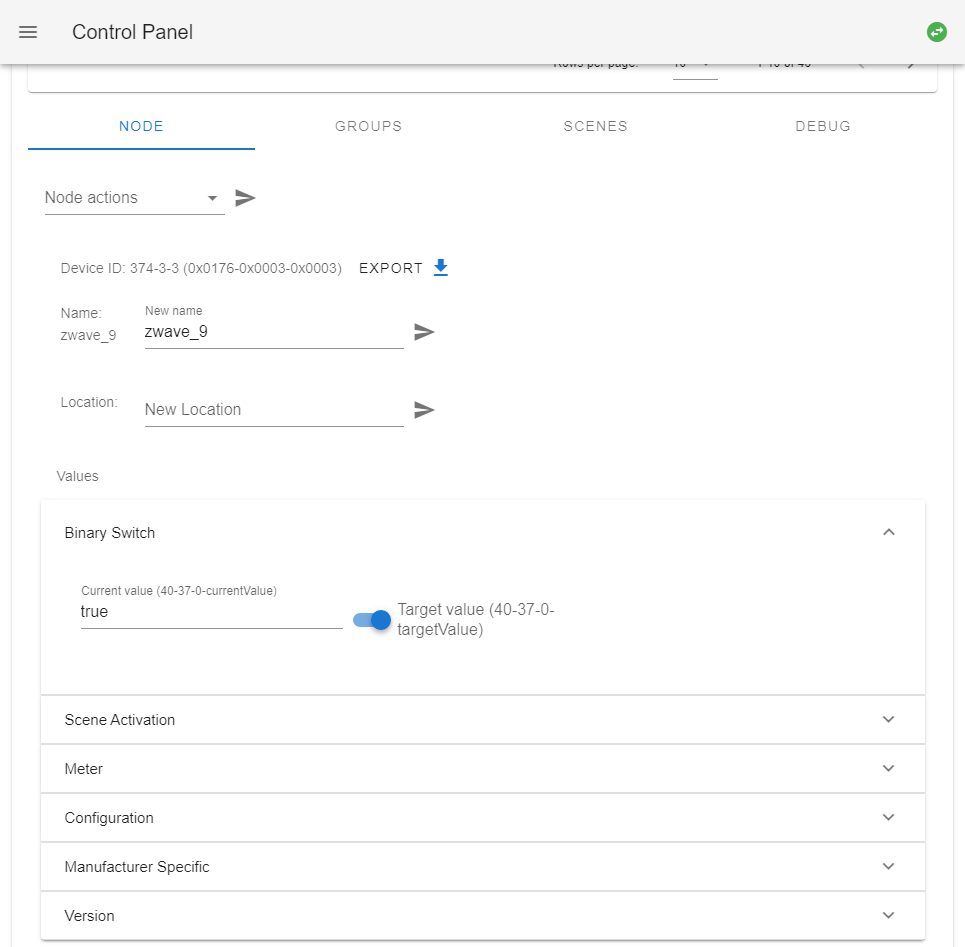
You should rename all your nodes before going to the next step.
If you want to give them a location you can, but “Location” will be inserted before “Name” in the Home-Assistant entities later, so I prefer leaving “Location” empty here.
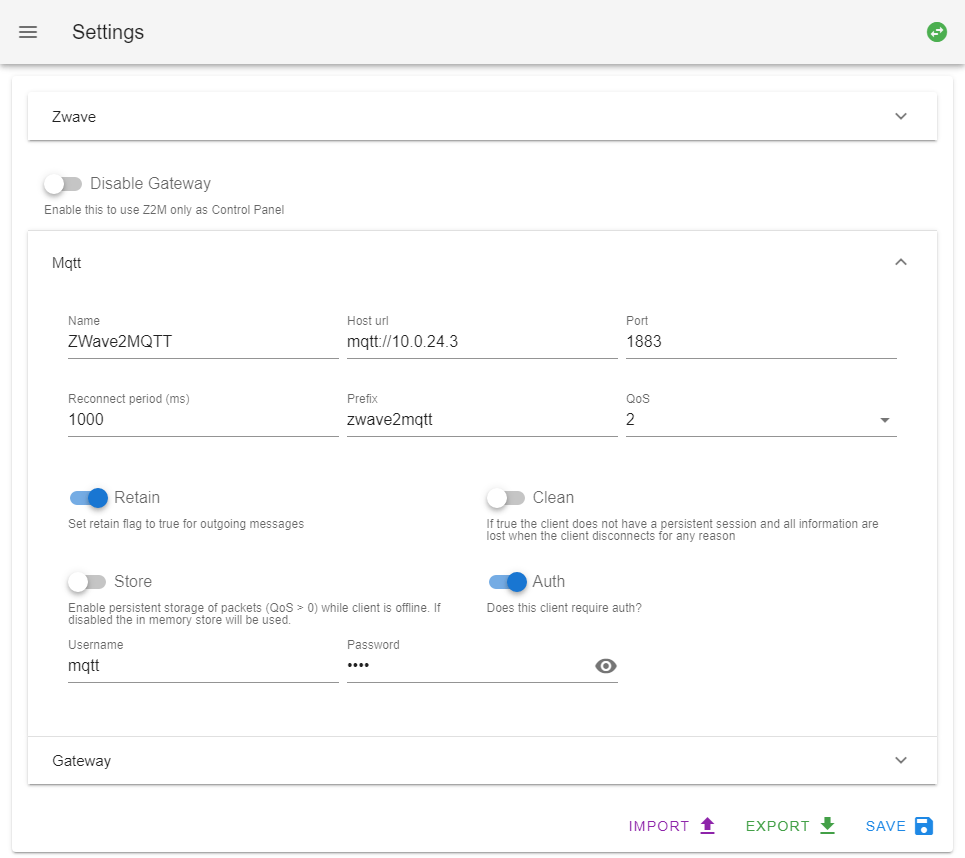
Settings: MQTT
Navigate back to Settings in the left-menu and expand MQTT.
Fill out like this:
- Deactivate Disable Gateway
- Name
ZWave2MQTT (Optional, unimportant for what I see) - Host Url
The address to the MQTT broker. Format like:mqtt://<ip> - Port
The MQTT port. 1883 is the default for unencrypted MQTT traffic in Mosquitto - Reconnect period (ms)
1000 ms (I don’t know what’s best practice value here) - Prefix
zwave2mqtt (Prefix of MQTT Payloadstate_topic) - QoS
2 (I don’t know what’s best practice value here) - Activate Retain
- Activate Auth and fill inn Username and Password for the MQT broker if this is set. Skip this step if not.
- Click SAVE
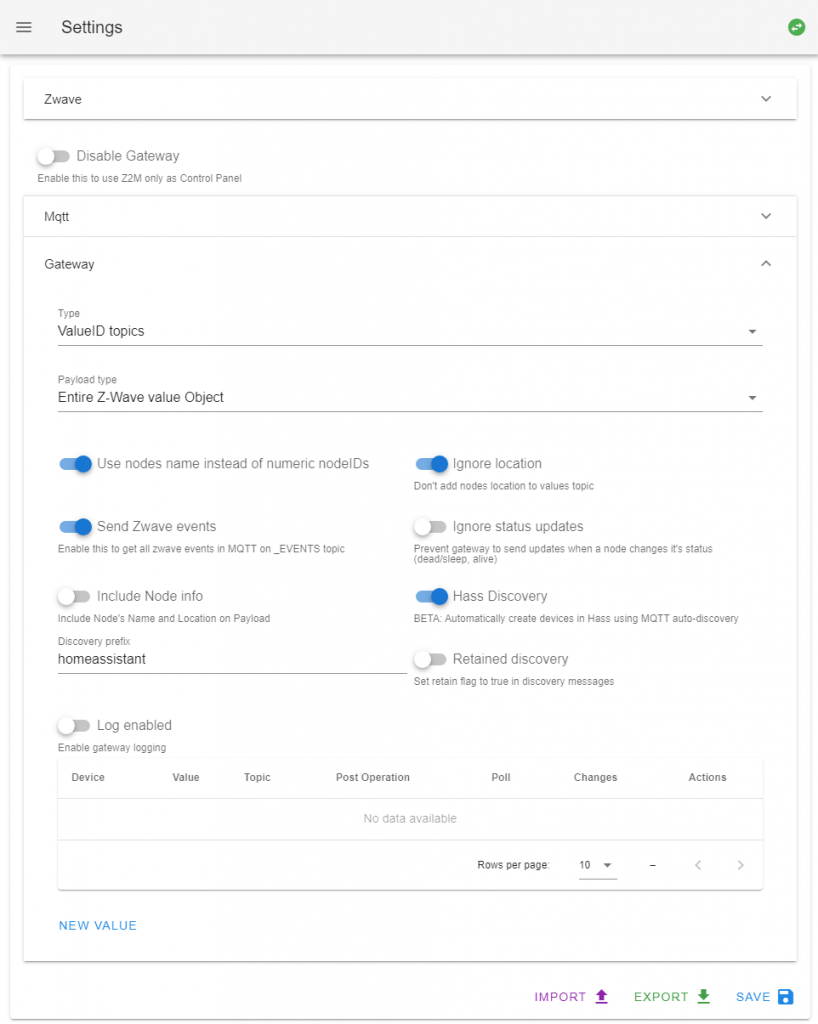
Settings: Gateway
Expand Gateway and fill out like this:
- Type
Select “ValueID topics” - Payload type
Select “Entire Z-Wave value Object” - Activate Use node name instead of numeric NodeIDs
- Activate Ignore location
- Activate Send Zwave events
- Activate Hass Discovery
- Discovery prefix
this must be “homeassistant” for the discovery to work. - Click SAVE.
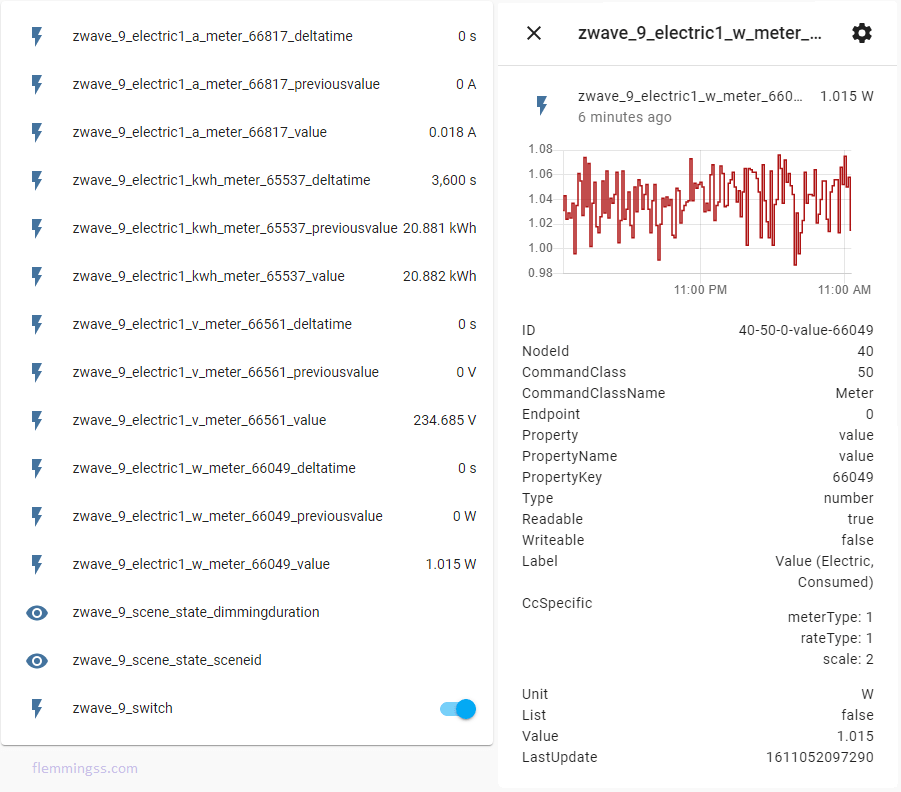
Home-Assistant
Nodes should now start to show up as MQTT devices with entity names like domain.node-name_XXX in Home-Assistant.
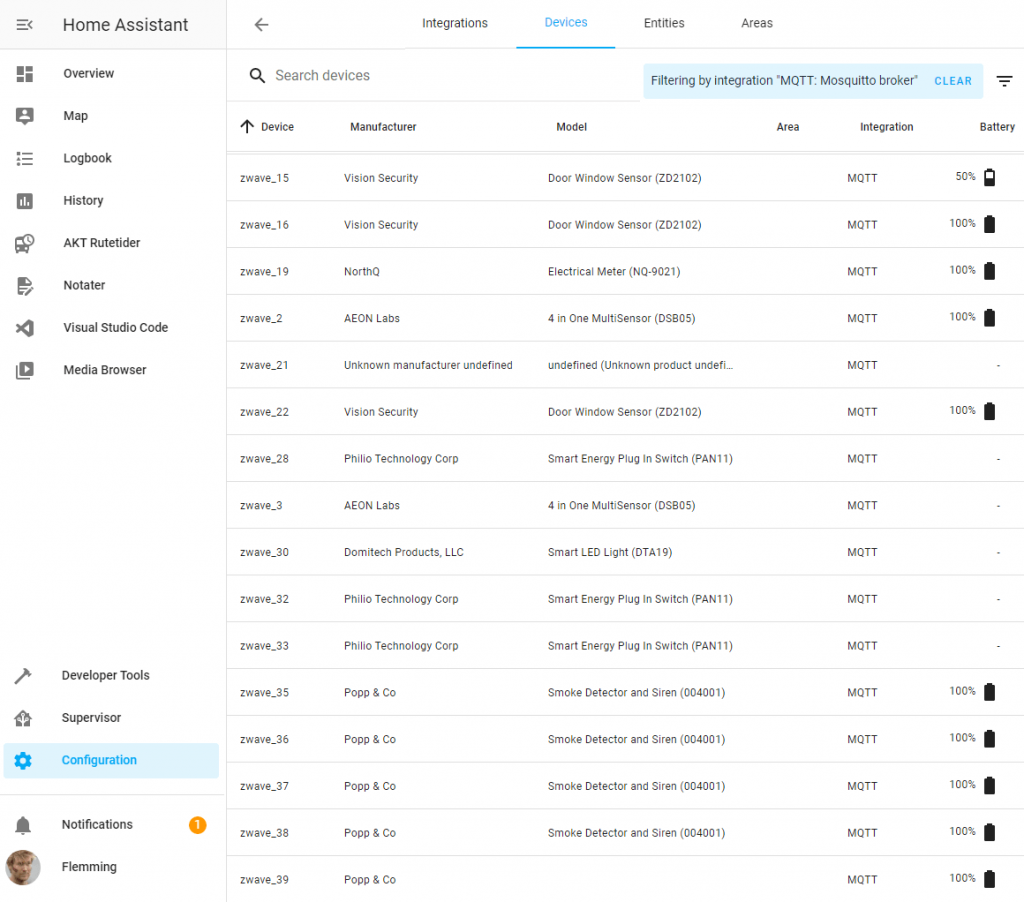
Entities in Devices
That is all, I hope this was a helpful guide 🙂
Sources
- https://www.home-assistant.io/docs/z-wave/installation/
- https://github.com/zwave-js/zwavejs2mqtt/discussions/180
- https://selfhostedhome.com/migrating-to-zwave2mqtt-for-home-assistant/
- https://community.home-assistant.io/t/zwave2mqtt-add-on-simple-tutorial/128371/
- https://github.com/zwave-js/zwavejs2mqtt
- https://github.com/OpenZWave/Zwave2Mqtt
- https://docs.docker.com/compose/reference/up/